この記事では、Google Apps Script (GAS) を利用して、Google Formを自動で作成するGPTの構築方法を紹介します。
このシステムを活用することで、アンケートやフィードバックフォームの作成作業を大幅に効率化し、貴重な時間を節約することが可能になります。
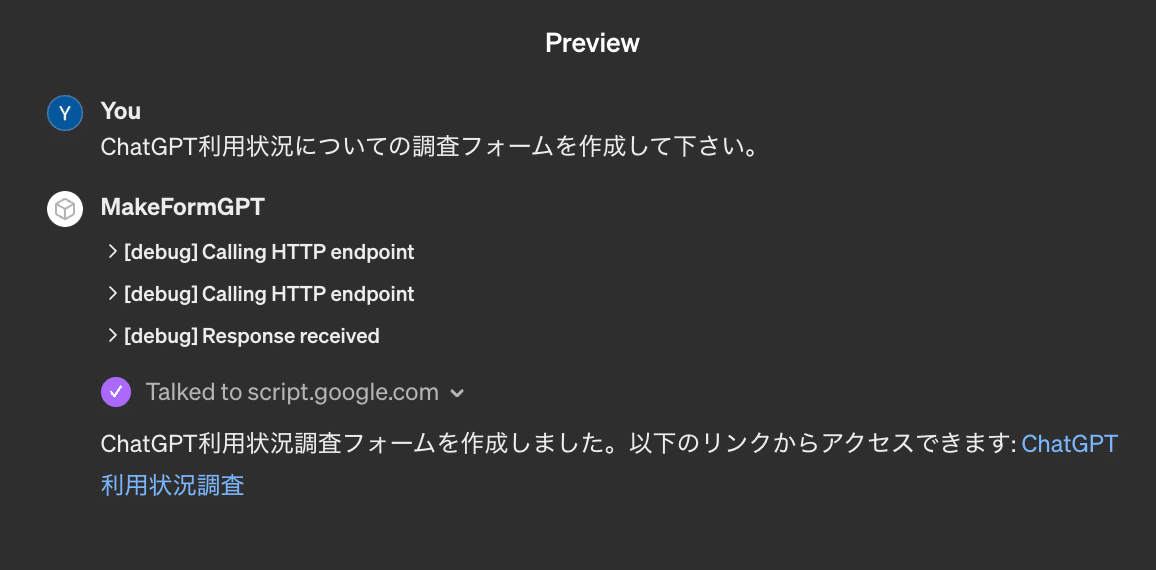
たとえば、「ChatGPT利用状況についての調査フォームを作成して」と指示するだけで、適切に質問が考えられたGoogle Formが自動で作成されます:
こちらが実際に作成されたGoogle Formです:
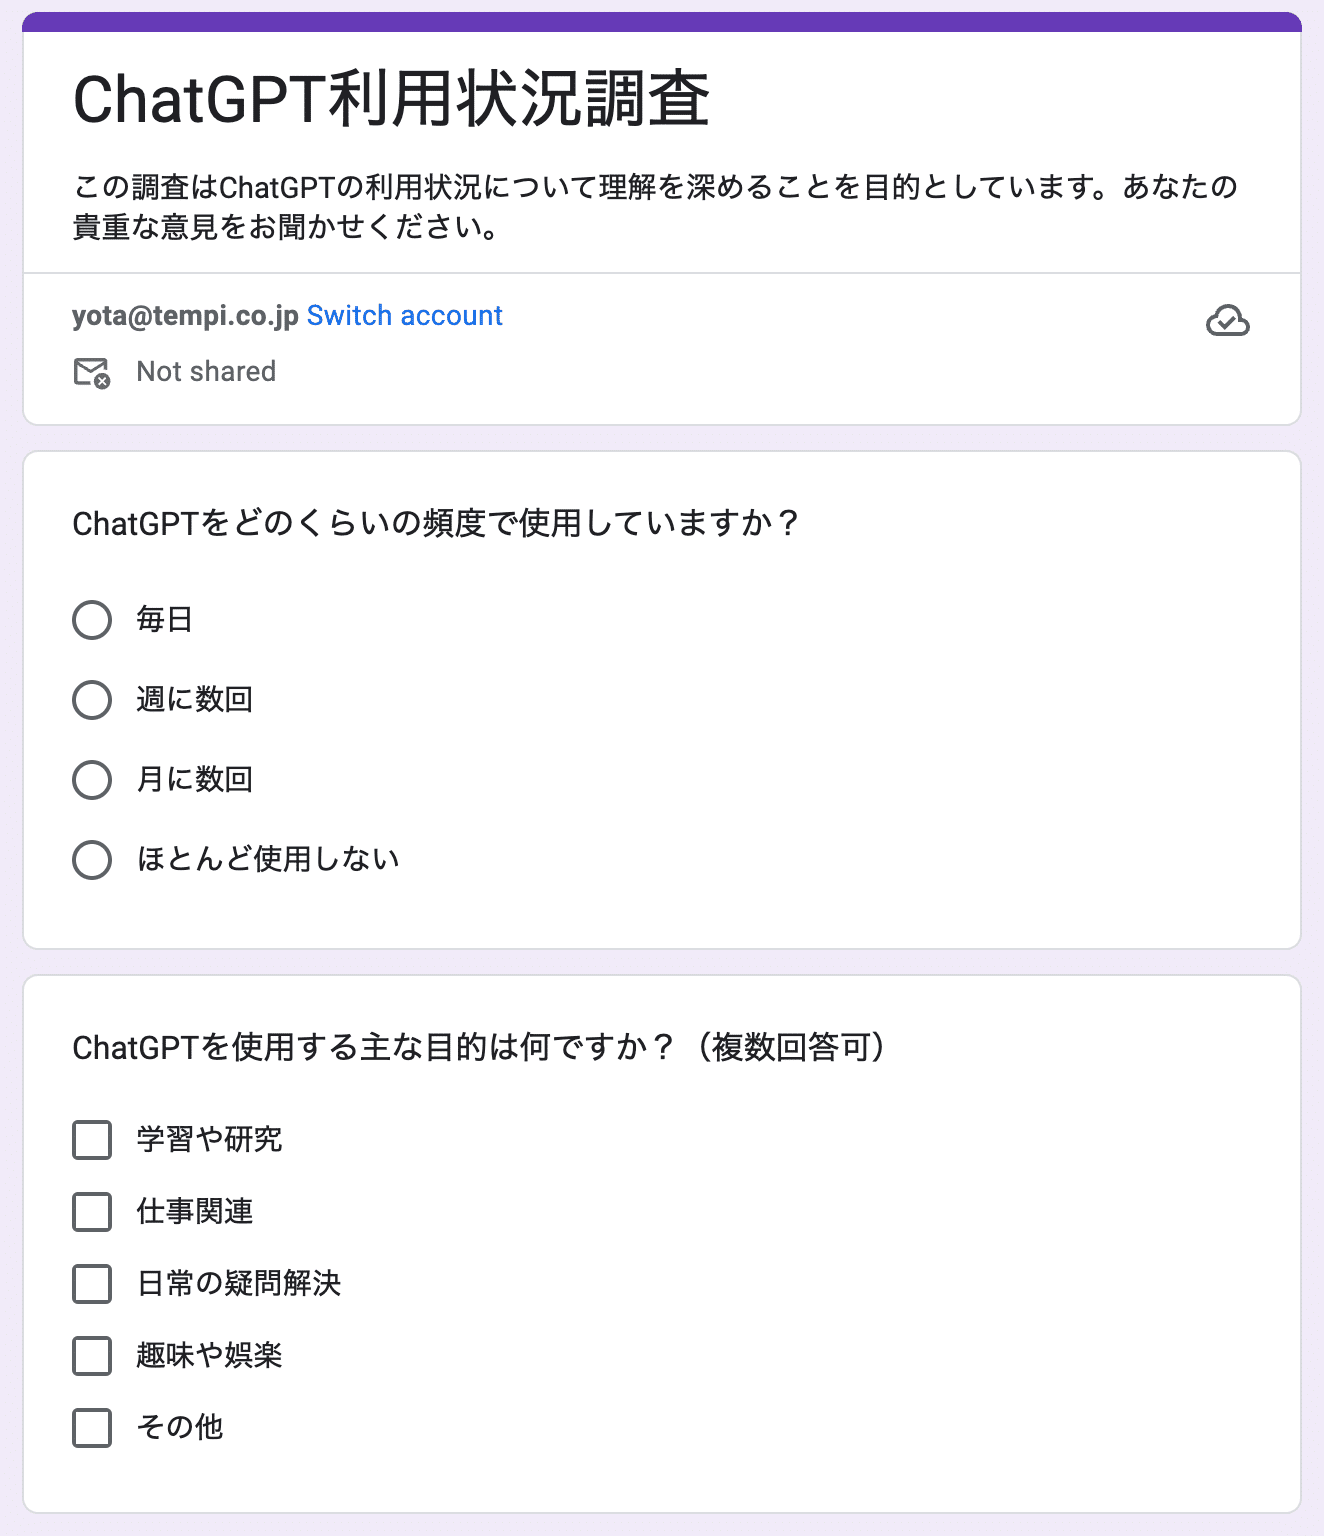

こちらのリンクから実際に回答できるので、よかったら回答して下さい:
https://docs.google.com/forms/d/e/1FAIpQLSf09QGODsV2p9YIQAOV9DjbLY8qv_er3ICMOBfhE_epWa1j1w/viewform?usp=sf_link
作成されたフォームは直接編集が可能で、必要に応じて質問を追加したり、フォームの設定を変更することができます。
重要なのは、GASを使用することでサーバー代もGPTの利用料も発生しないため、コストを気にせず使用できる点です。
それでは、以下から実際にフォーム作成GPTを作成していきます。
フォーム作成GPTの構築方法
それでは、フォーム作成GPTの構築手順を見ていきましょう。
Step 1. Google Apps Script を作成する
Google Apps Scriptにアクセスし、「新しいプロジェクト」をクリックします。
デフォルトで書かれているコードを全て削除し、以下のGASコードを貼り付けます。
function doPost(e) {
 try {
   if (!e.postData) {
     throw new Error("No post data received");
   }
   const requestBody = JSON.parse(e.postData.contents);
   const result = makeGoogleForm_(requestBody)
   return ContentService.createTextOutput(result).setMimeType(ContentService.MimeType.TEXT);
 } catch (error) {
   return ContentService.createTextOutput(error.toString()).setMimeType(ContentService.MimeType.TEXT);
 }
}

function makeGoogleForm_(args) {
  try {
    const { title, description, items } = args
    const form = FormApp.create(title);
    form.setDescription(description);
    form.setTitle(title);
    items.forEach(function (section) {
      if (section.type === 'multipleChoice') {
        const item = form.addMultipleChoiceItem();
        item.setTitle(section.title)
          .setChoiceValues(section.choices);
      } else if (section.type === 'paragraph') {
        const item = form.addParagraphTextItem();
        item.setTitle(section.title);
      } else if (section.type === 'date') {
        const item = form.addDateItem();
        item.setTitle(section.title);
      } else if (section.type === 'time') {
        const item = form.addTimeItem();
        item.setTitle(section.title);
      } else if (section.type === 'grid') {
        const item = form.addGridItem();
        item.setTitle(section.title)
          .setRows(section.rows)
          .setColumns(section.columns);
      } else if (section.type === 'scale') {
        const item = form.addScaleItem();
        item.setTitle(section.title)
          .setBounds(1, 5)
          .setLabels(section.lowerLabel, section.upperLabel);
      } else if (section.type === 'checkbox') {
        const item = form.addCheckboxItem();
        item.setTitle(section.title)
          .setChoiceValues(section.choices);
      } else { // 'text' or any other type
        const item = form.addTextItem();
        item.setTitle(section.title);
      }
    });
    return `Successfully made form at the URL: ${form.getEditUrl()} and the title is ${title}`
  } catch (e) {
    return`Failed to make form with the Error: ${e}`
  }
}
このスクリプトは、指定された情報をもとにGoogle Formを作成します。作成されたフォームは、このスクリプトを実行したGoogleアカウントに紐付けられます。
Step 2. Google Apps Script をデプロイする
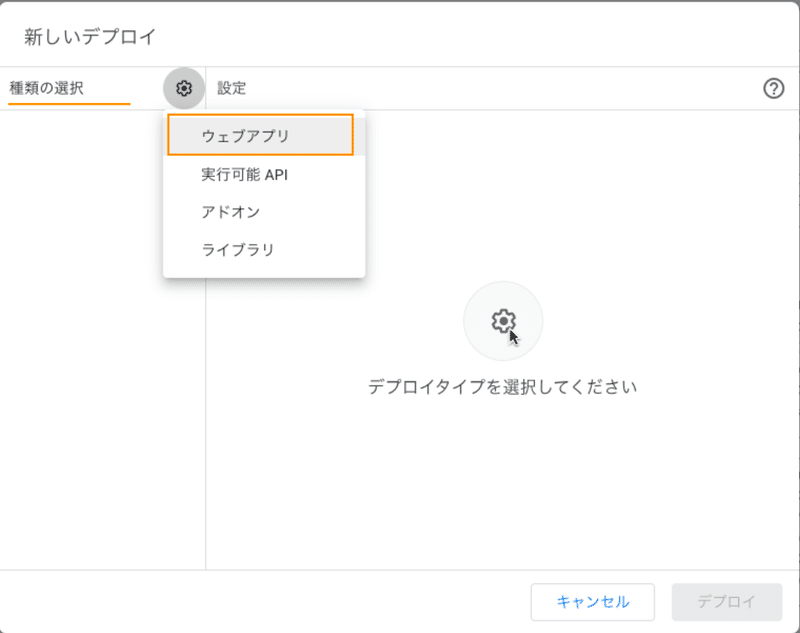
スクリプトエディタの上部にある「デプロイ」ボタンをクリックし、「新しいデプロイ」を選択します。
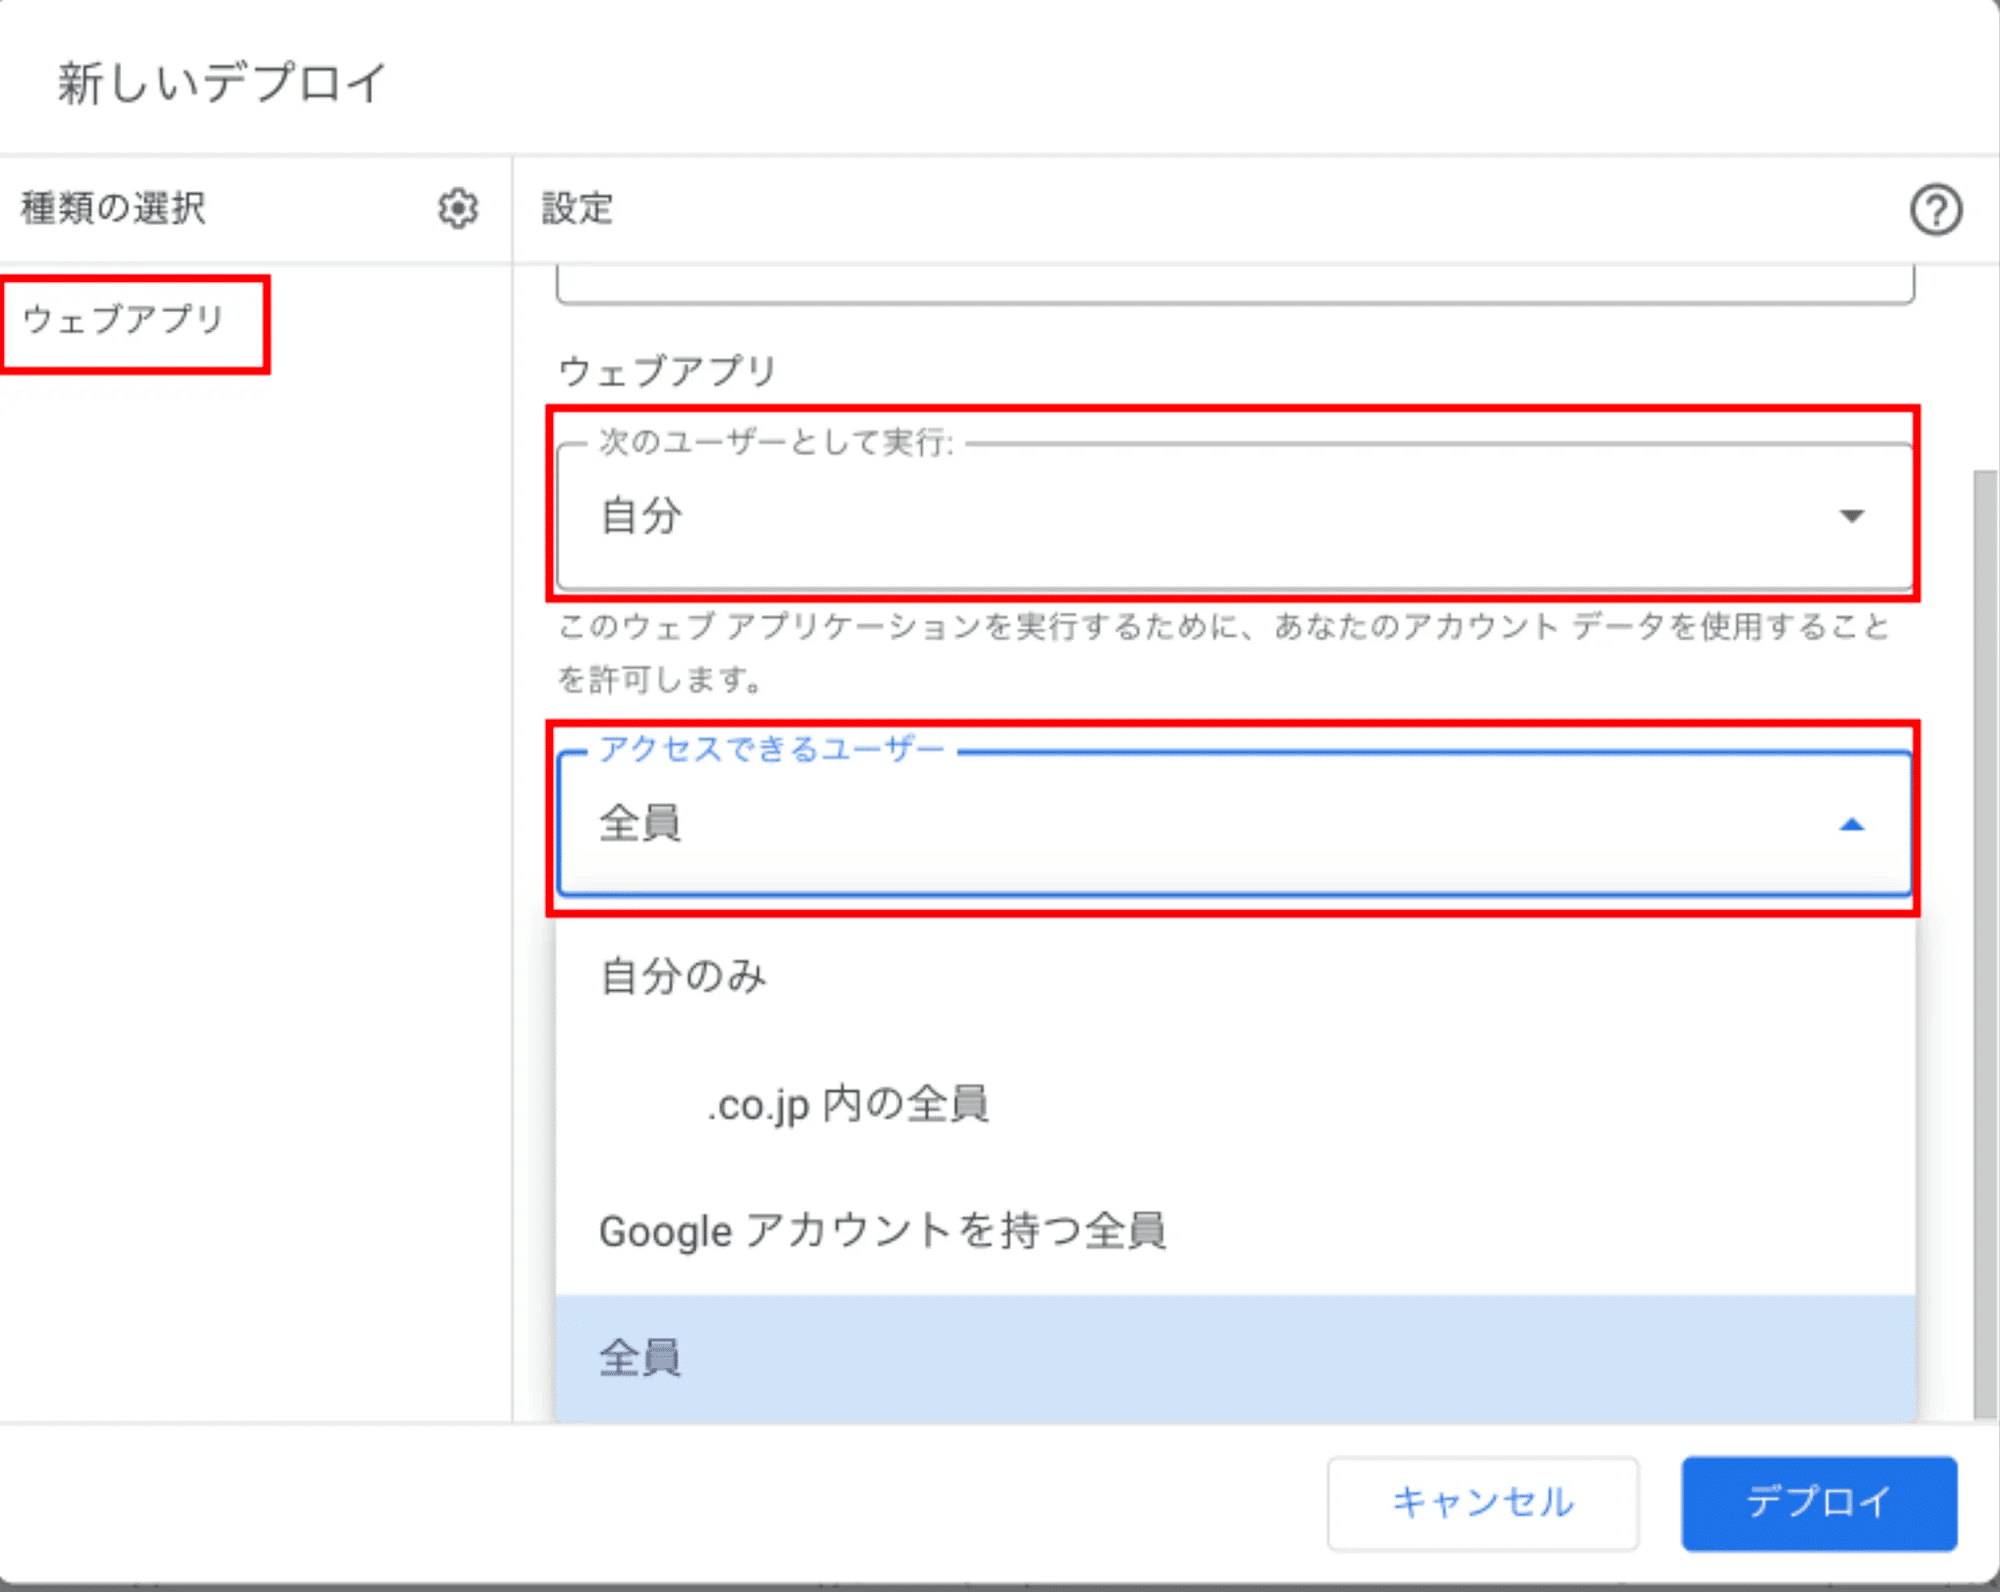
「種類の選択」で「ウェブアプリ」を選び、設定を完了させます。
「次のユーザーとして実行」を「自分」に、「アクセスできるユーザー」 を 「全員」 に設定します:
右下の「デプロイ」 をクリックします
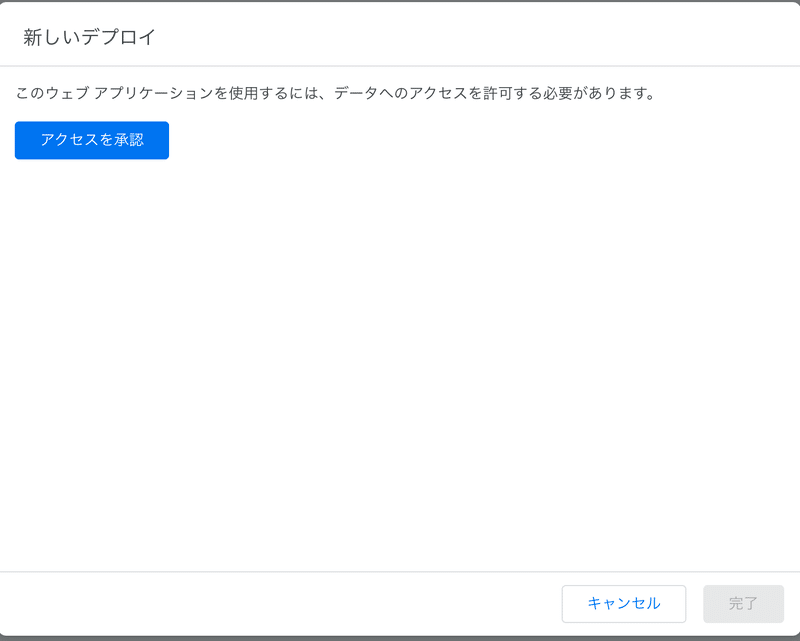
次の画面で「アクセスを承認」を押し、Googleアカウントへログインします。
デプロイが完了すると、ウェブアプリのURLが生成されます。このURLは後のステップで使用します。
Step 3. GPTの設定を行う
GPTsのConfigure画面上で、フォーム作成GPTの動作設定を行います。
名前はなんでもいいですが、「MakeFormGPT」などわかりやすい名前にしておきます。
具体的なプロンプト例は以下の通りです。
あなたは私の秘書として、必要な時にcreateGoogleFormを使って、
Googleフォームを作成してください。

# フォームの内容についての指示
- 適切なフォームの質問内容を自動で決定して下さい。
- フォームを作成するべきと判断したら即時にcreateGoogleFormを呼び出して下さい。
- typeプロパティには、文字列として、次のタイプが使えます: checkbox, scale, grid, time, date, paragraph, multipleChoice
- 各質問について、適切とタイプを選択して下さい。
Step 4. Actions の設定を行なう
ChatGPTのActions設定画面で「Create new action」をクリックし、
以下のYAMLファイルを基に設定を行います。
openapi: 3.0.0
info:
  title: Google Form Creation API
  description: This API allows for the automatic creation of Google Forms via Google Apps Script.
  version: 1.0.0
servers:
  - url: https://script.google.com
paths:
  /macros/s/デプロイしたGASのIDを挿入します/exec:
    post:
      summary: Create a Google Form
      description: Creates a new Google Form based on the provided details.
      operationId: createGoogleForm
      requestBody:
        required: true
        content:
          application/json:
            schema:
              type: object
              required:
                - title
                - description
                - items
              properties:
                title:
                  type: string
                  description: Title of the Google Form.
                description:
                  type: string
                  description: Description of the Google Form.
                items:
                  type: array
                  description: List of items/questions to be included in the form.
                  items:
                    type: object
                    required:
                      - type
                      - title
                    properties:
                      type:
                        type: string
                        description: Type of the form item (e.g., 'multipleChoice', 'paragraph').
                      title:
                        type: string
                        description: Title of the form item.
                      choices:
                        type: array
                        items:
                          type: string
                        description: Available choices for 'multipleChoice' or 'checkbox' types.
                      rows:
                        type: array
                        items:
                          type: string
                        description: Rows for 'grid' type.
                      columns:
                        type: array
                        items:
                          type: string
                        description: Columns for 'grid' type.
                      lowerLabel:
                        type: string
                        description: Label for the lower end of a 'scale' item.
                      upperLabel:
                        type: string
                        description: Label for the upper end of a 'scale' item.
      responses:
        "200":
          description: Form successfully created.
          content:
            text/plain:
              schema:
                type: string
                description: Success message with form URL.
        "400":
          description: Bad request if the request parameters are not correct.
        "500":
description: Internal server error if something goes wrong on the server side.「デプロイしたGASのIDを挿入します」の部分に、Step 2で取得したGASのIDを挿入します。
以上で、フォーム作成GPTの構築は完了です。
実際に使ってみて、Google Formが期待通りに作成されるか確認しましょう!
注意点
このGPTは個人使用を前提としています。
他人と共有する場合は、適切なプライバシーポリシーの設定が必要です。
サーバー代やGPT代はかかりませんが、Google Formの利用にはGoogle Workspaceの利用制限が適用される場合があります。
このガイドを通じて、Google Formの作成を自動化し、より効率的なワークフローを構築できることを願っています。