
本記事では、以下のデモのように、GPTを自分のGoogle カレンダーと連携して、
予定の確認
予定の削除
予定の編集
予定の追加
を行う方法を、ステップバイステップで解説します。
重要な点として、GAS + GPTs のシステム構成だとサーバー代、GPT代ともにゼロコストで運用できる点があります。
GAS版の秘書GPTは、適宜、更新予定です。
GPTsラボへのご参加がおすすめです。
作り方
早速ですが、GASでカレンダー連携するGPTの作り方をみていきます。
Step 1. Google Apps Script を作成する
以下のサイトにアクセスして、新しいプロジェクトをクリックします。
https://script.google.com/home
重要な点として、このGoogle Apps Scriptを作成したGoogleアカウントに紐づくカレンダーを操作することになります。
まず、元々書いてあるコードを全て削除したのち、以下のコードをすべて貼り付けます。
function doPost(e) {
  try {
    if (!e.postData) {
      throw new Error("No post data received");
    }
    const requestBody = JSON.parse(e.postData.contents);
    let result;

    // Determine the type of request based on the operation field
    switch (requestBody.operation) {
      case "createEvent":
        result = setCalendarEvent_(requestBody);
        break;
      case "viewEvents":
        result = viewCalendarEvents_(requestBody);
        break;
      case "deleteEvent":
        result = deleteCalendarEvent_(requestBody);
        break;
      case "updateEvent":
        result = updateCalendarEvent_(requestBody);
        break;
      default:
        throw new Error("Invalid operation specified");
    }

    return ContentService.createTextOutput(result)
      .setMimeType(ContentService.MimeType.JSON);
  } catch (error) {
    return ContentService.createTextOutput(
      JSON.stringify({ "error": error.toString() })
    ).setMimeType(ContentService.MimeType.JSON);
  }
}


function validateRequiredArgs(args, requiredArgs) {
  const missingArgs = requiredArgs.filter(arg => !args[arg]);
  if (missingArgs.length > 0) {
    return `Missing required argument(s): ${missingArgs.join(", ")}`;
  }
  return null; // No missing arguments
}


function viewCalendarEvents_(args) {
  try {
    if (validateRequiredArgs(args, ['startDate', 'endDate'])) {
      return JSON.stringify({ "error": validationError });
    }

    const { startDate, endDate } = args;
    const events = CalendarApp.getDefaultCalendar().getEvents(new Date(startDate), new Date(endDate));
    const eventDetails = events.map(event => {
      const attendees = event.getGuestList().map(guest => guest.getEmail()).join(", ");
      return {
        title: event.getTitle(),
        start: formatDate_(event.getStartTime()),
        end: formatDate_(event.getEndTime()),
        location: event.getLocation(),
        description: event.getDescription(),
        attendees: attendees,
        id: event.getId()
      };
    });
    return JSON.stringify(eventDetails);
  } catch (e) {
    return JSON.stringify({ "error": `Failed to get calendar events with the Error: ${e}` });
  }
}


function deleteCalendarEvent_(args) {
  try {
    if (validateRequiredArgs(args, ['eventId'])) {
      return JSON.stringify({ "error": validationError });
    }
    const { eventId } = args
    const event = CalendarApp.getDefaultCalendar().getEventById(eventId)
    if (!event) {
      throw Error(`Could not found Event:${eventId}`)
    }
    event.deleteEvent()
    return `The Event(ID: ${eventId}) removal was successful.`
  } catch (e) {
    return `Failure to delete. Error: ${e}`
  }
}

function updateCalendarEvent_(args) {
  try {
    if (validateRequiredArgs(args, ['eventId'])) {
      return JSON.stringify({ "error": validationError });
    }

    let { eventId, title, startDate, endDate, description, location, attendeesToBeAdded, attendeesToBeDeleted } = args
    const event = CalendarApp.getDefaultCalendar().getEventById(eventId)
    if (!event) {
      throw Error(`Could not found Event:${eventId}`)
    }

    if (title) event.setTitle(title)
    else {
      title = event.getTitle()
    }
    if (startDate && endDate) event.setTime(new Date(startDate), new Date(endDate))
    else {
      startDate = event.getStartTime()
      endDate = event.getEndTime()
    }
    if (description) event.setDescription(description)
    else {
      description = event.getDescription()
    }
    if (location) event.setLocation(location)
    else {
      location = event.getLocation()
    }
    if (attendeesToBeAdded) {
      attendeesToBeAdded.forEach(guest => event.addGuest(guest))
    }
    if (attendeesToBeDeleted) {
      attendeesToBeDeleted.forEach(guest => event.removeGuest(guest))
    }
    const attendees = event.getGuestList().map(guest => guest.getEmail())
    const startDateFormatted = formatDate_(new Date(startDate));
    const endDateFormatted = formatDate_(new Date(endDate));
    const attendeesString = attendees.join('、');

    return `The event update was successful. Updated event titled ${title} from ${startDateFormatted} to ${endDateFormatted} at location ${location} with attendees ${attendeesString}`
  } catch (e) {
    return `Failure to update event. Error: ${e}`
  }
}

function setCalendarEvent_(args) {
  try {
    if (validateRequiredArgs(args, ['title', 'startDate', 'endDate'])) {
      return JSON.stringify({ "error": validationError });
    }

    const { title, startDate, endDate, description, location, attendees = [] } = args;
    const calendar = CalendarApp.getDefaultCalendar();

    const event = calendar.createEvent(
      title,
      new Date(startDate),
      new Date(endDate),
      {
        description: description,
        location: location ?? '',
        guests: attendees.join(','),
        sendInvites: true
      }
    );

    const startDateFormatted = formatDate_(new Date(startDate));
    const endDateFormatted = formatDate_(new Date(endDate));
    const attendeesString = attendees.join('、');

    return `Successfully created the event titled ${title} from ${startDateFormatted} to ${endDateFormatted} at location ${location} with attendees ${attendeesString}. The Event ID is: ${event.getId()}`;
  } catch (e) {
    return `Failed to add event to Calendar with the Error message: ${e}.`;
  }
}


function formatDate_(date) {
  const year = date.getFullYear();
  const month = ("0" + (date.getMonth() + 1)).slice(-2);
  const day = ("0" + date.getDate()).slice(-2);
  const hour = ("0" + date.getHours()).slice(-2);
  const minute = ("0" + date.getMinutes()).slice(-2);
  return `${year}年${month}月${day}日 ${hour}:${minute}`;
}
Step 2. Google Apps Script をデプロイする
続いて、このスクリプトをデプロイします。
「種類の選択」で「ウェブアプリ」 を選択後、
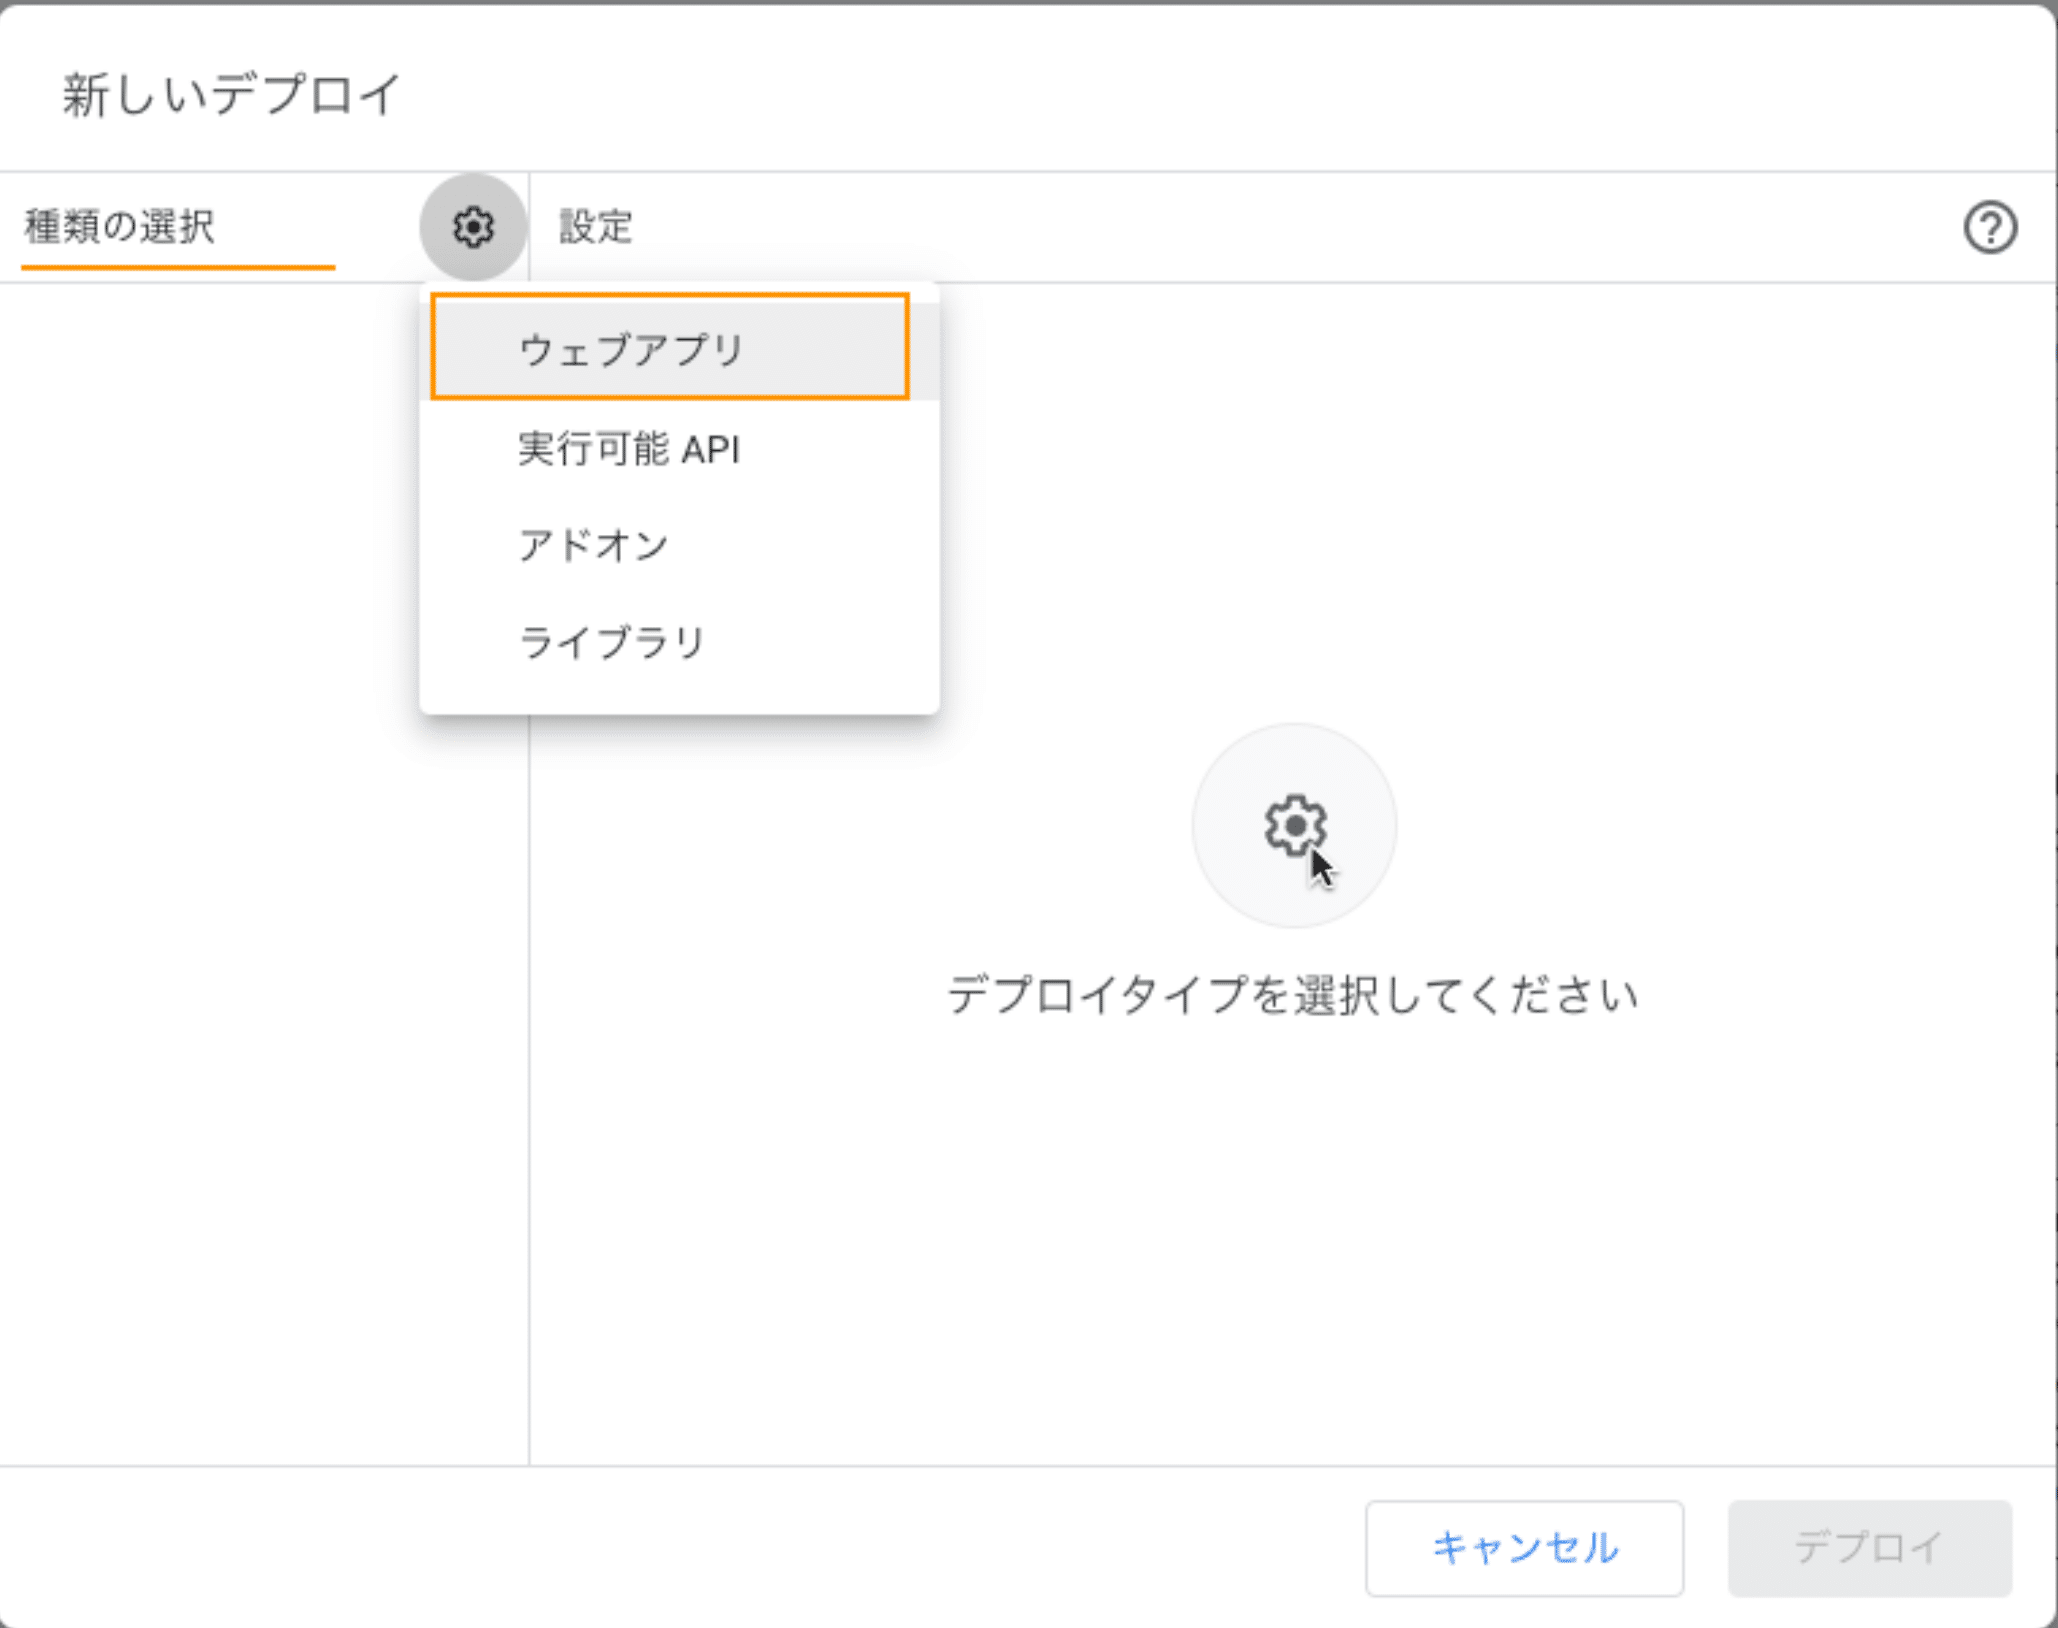
「次のユーザーとして実行」を「自分」に、
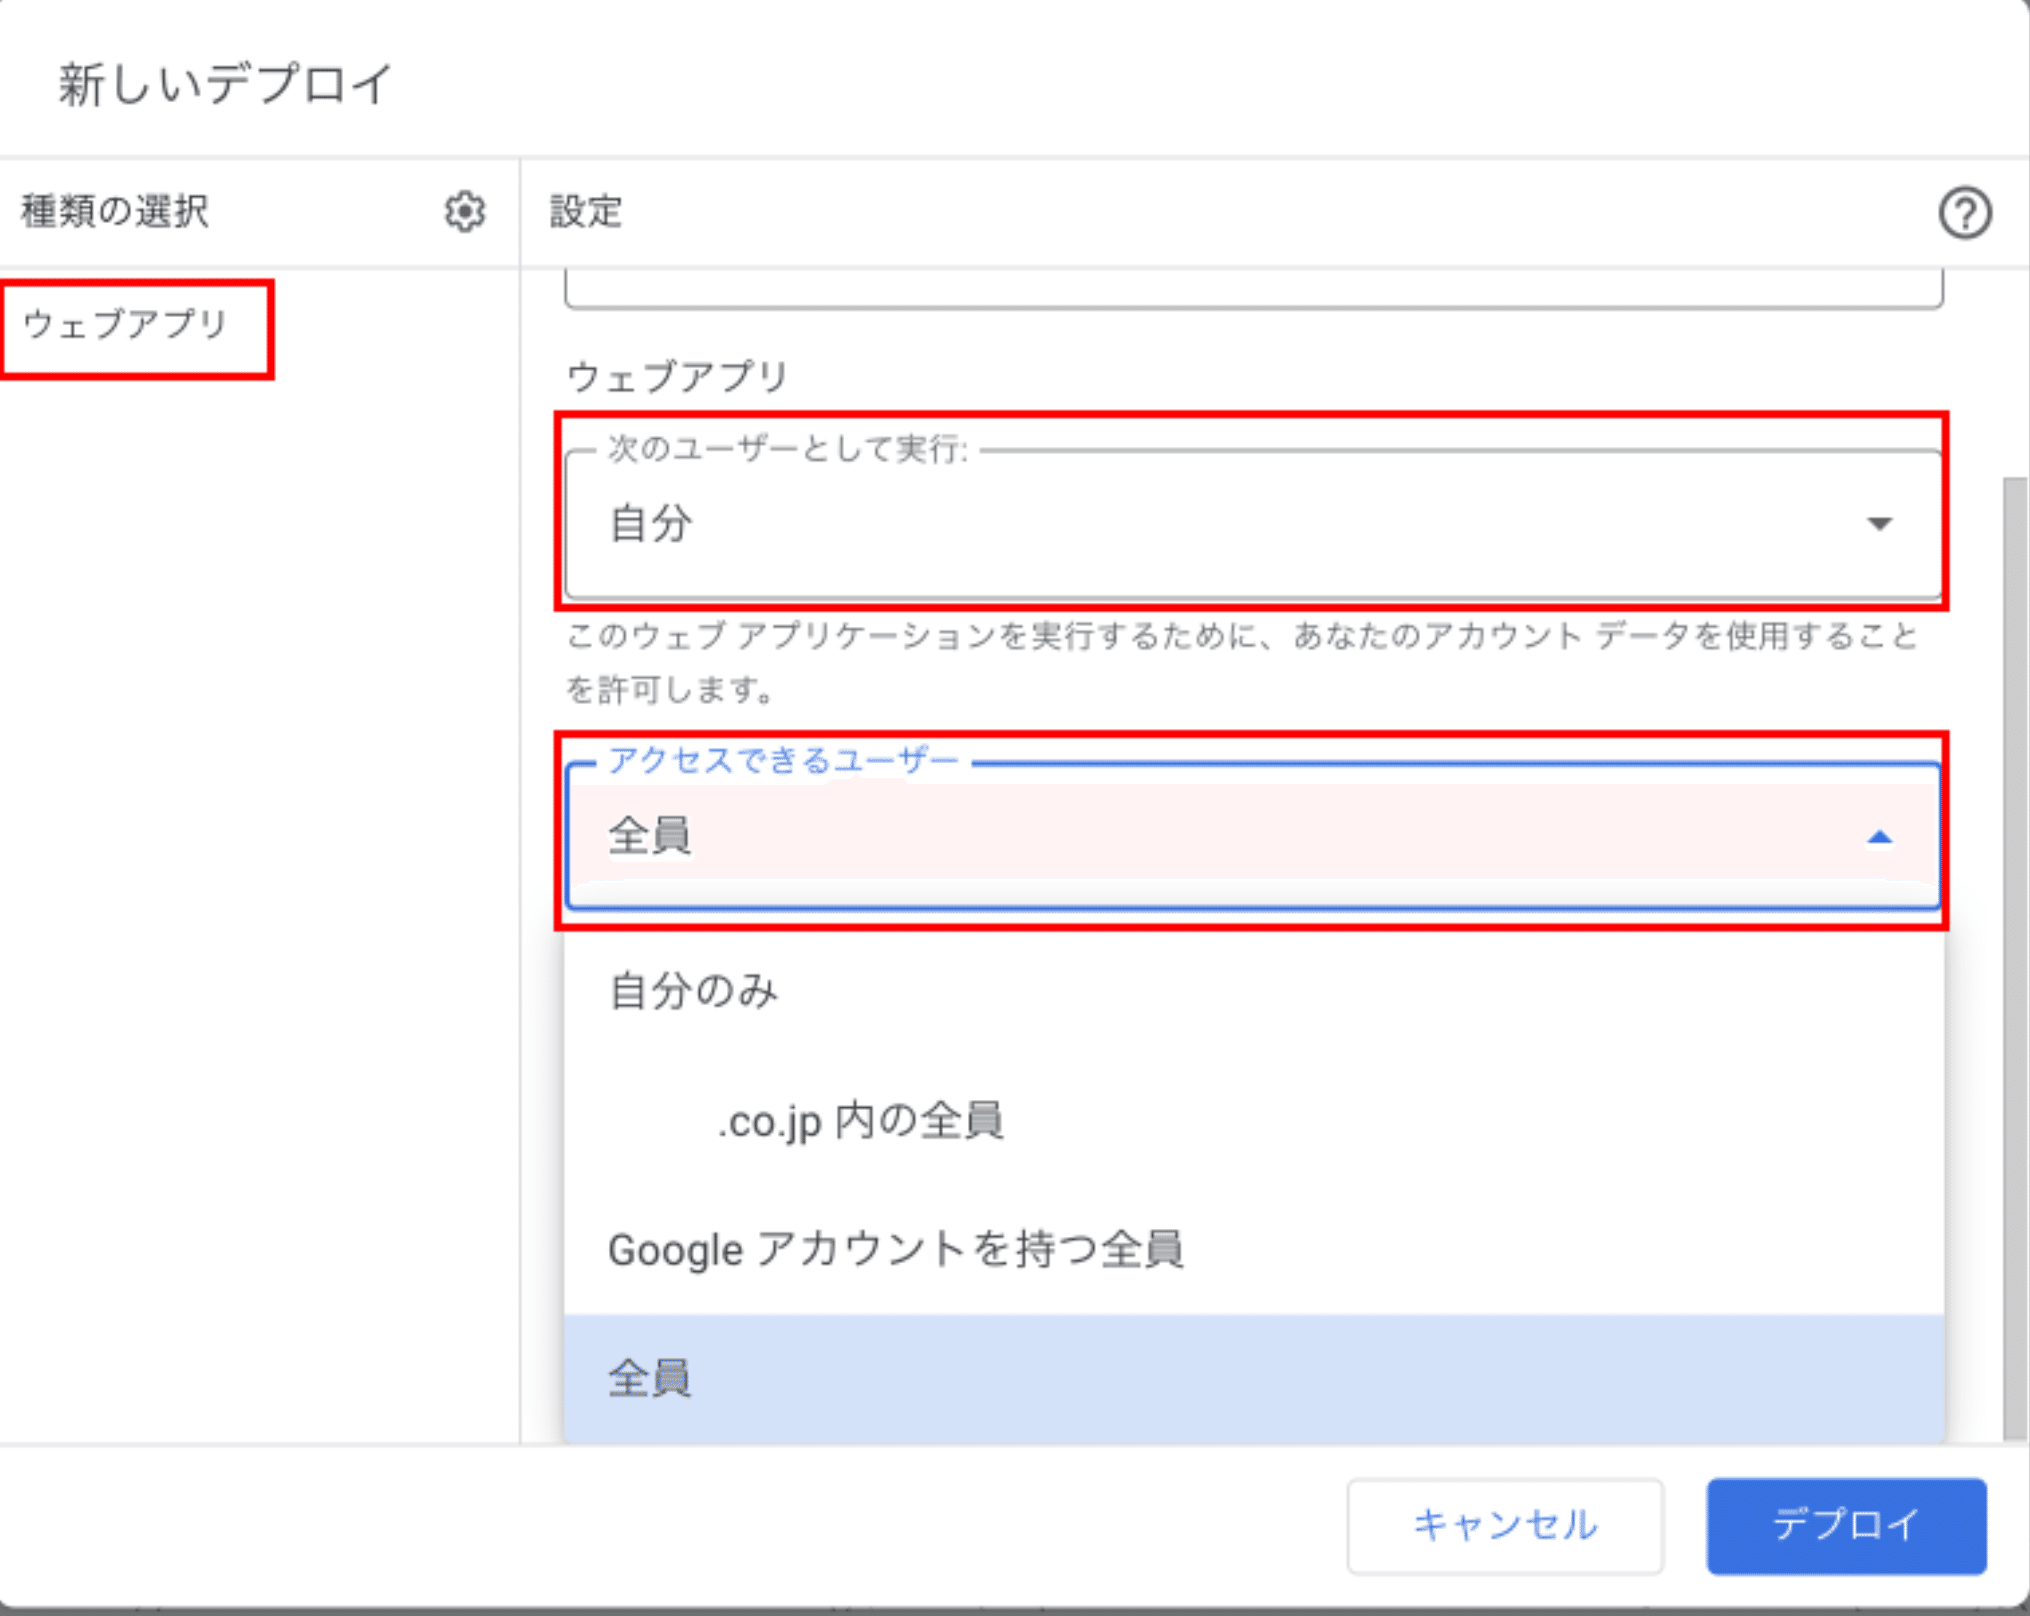
「アクセスできるユーザー」 を 「全員」 に設定します
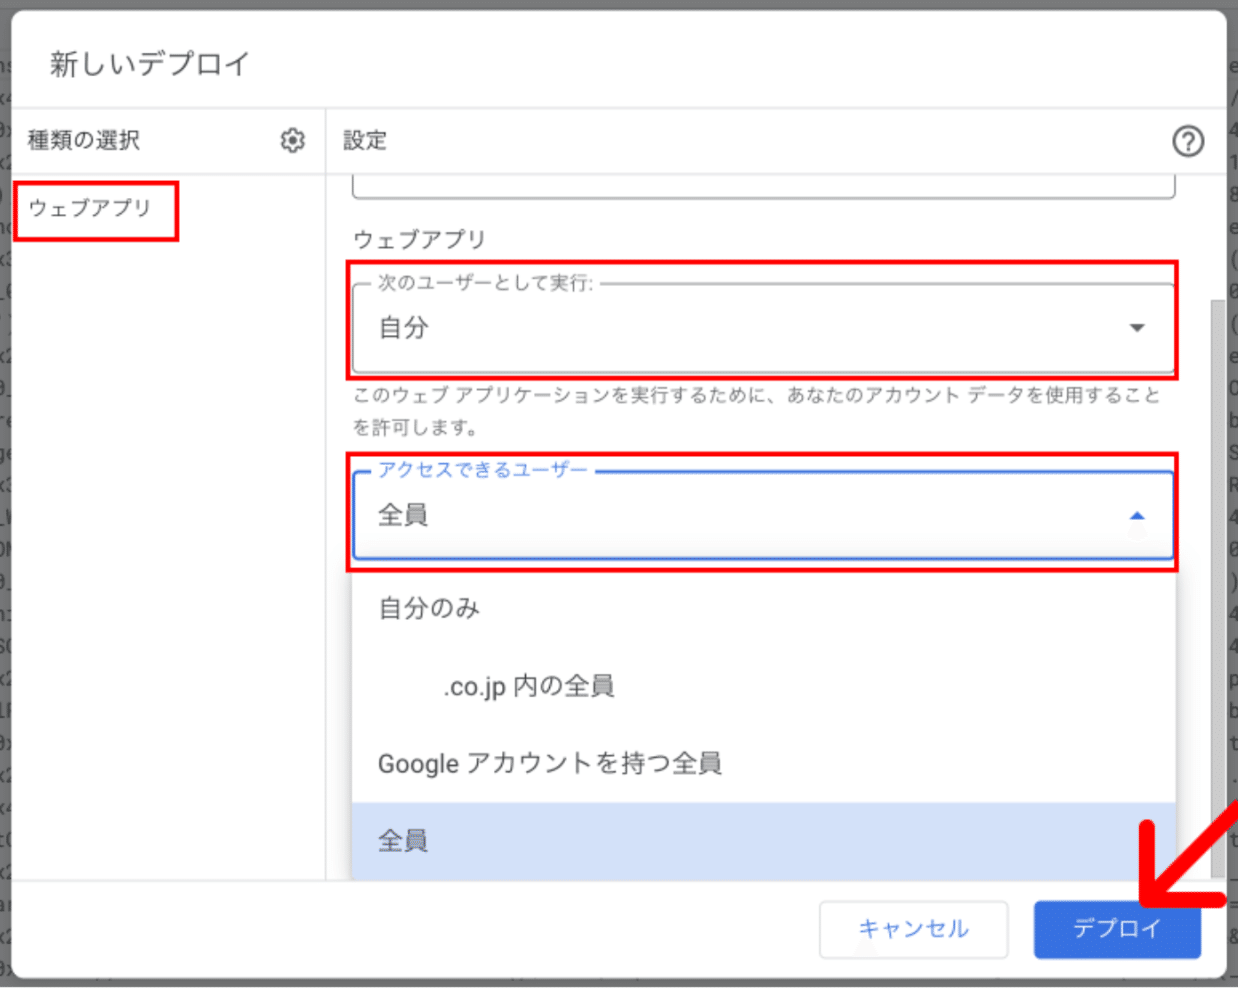
右下の「デプロイ」 をクリックします
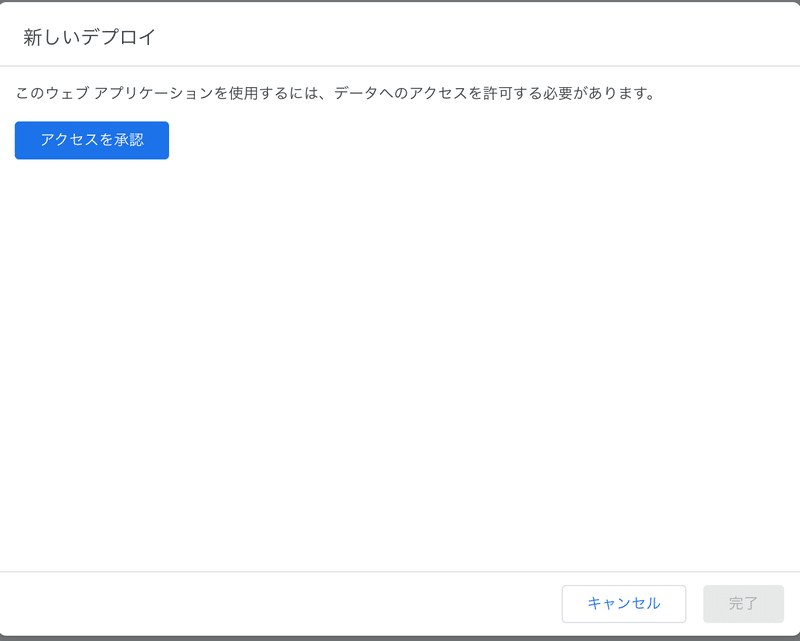
次の画面で「アクセスを承認」を押し、Googleアカウントへログインします。
備考)エンタープライズアカウント以外では、次の画面で以下のように、「このアプリはGoogleで確認されていません」という画面が出る場合があります。
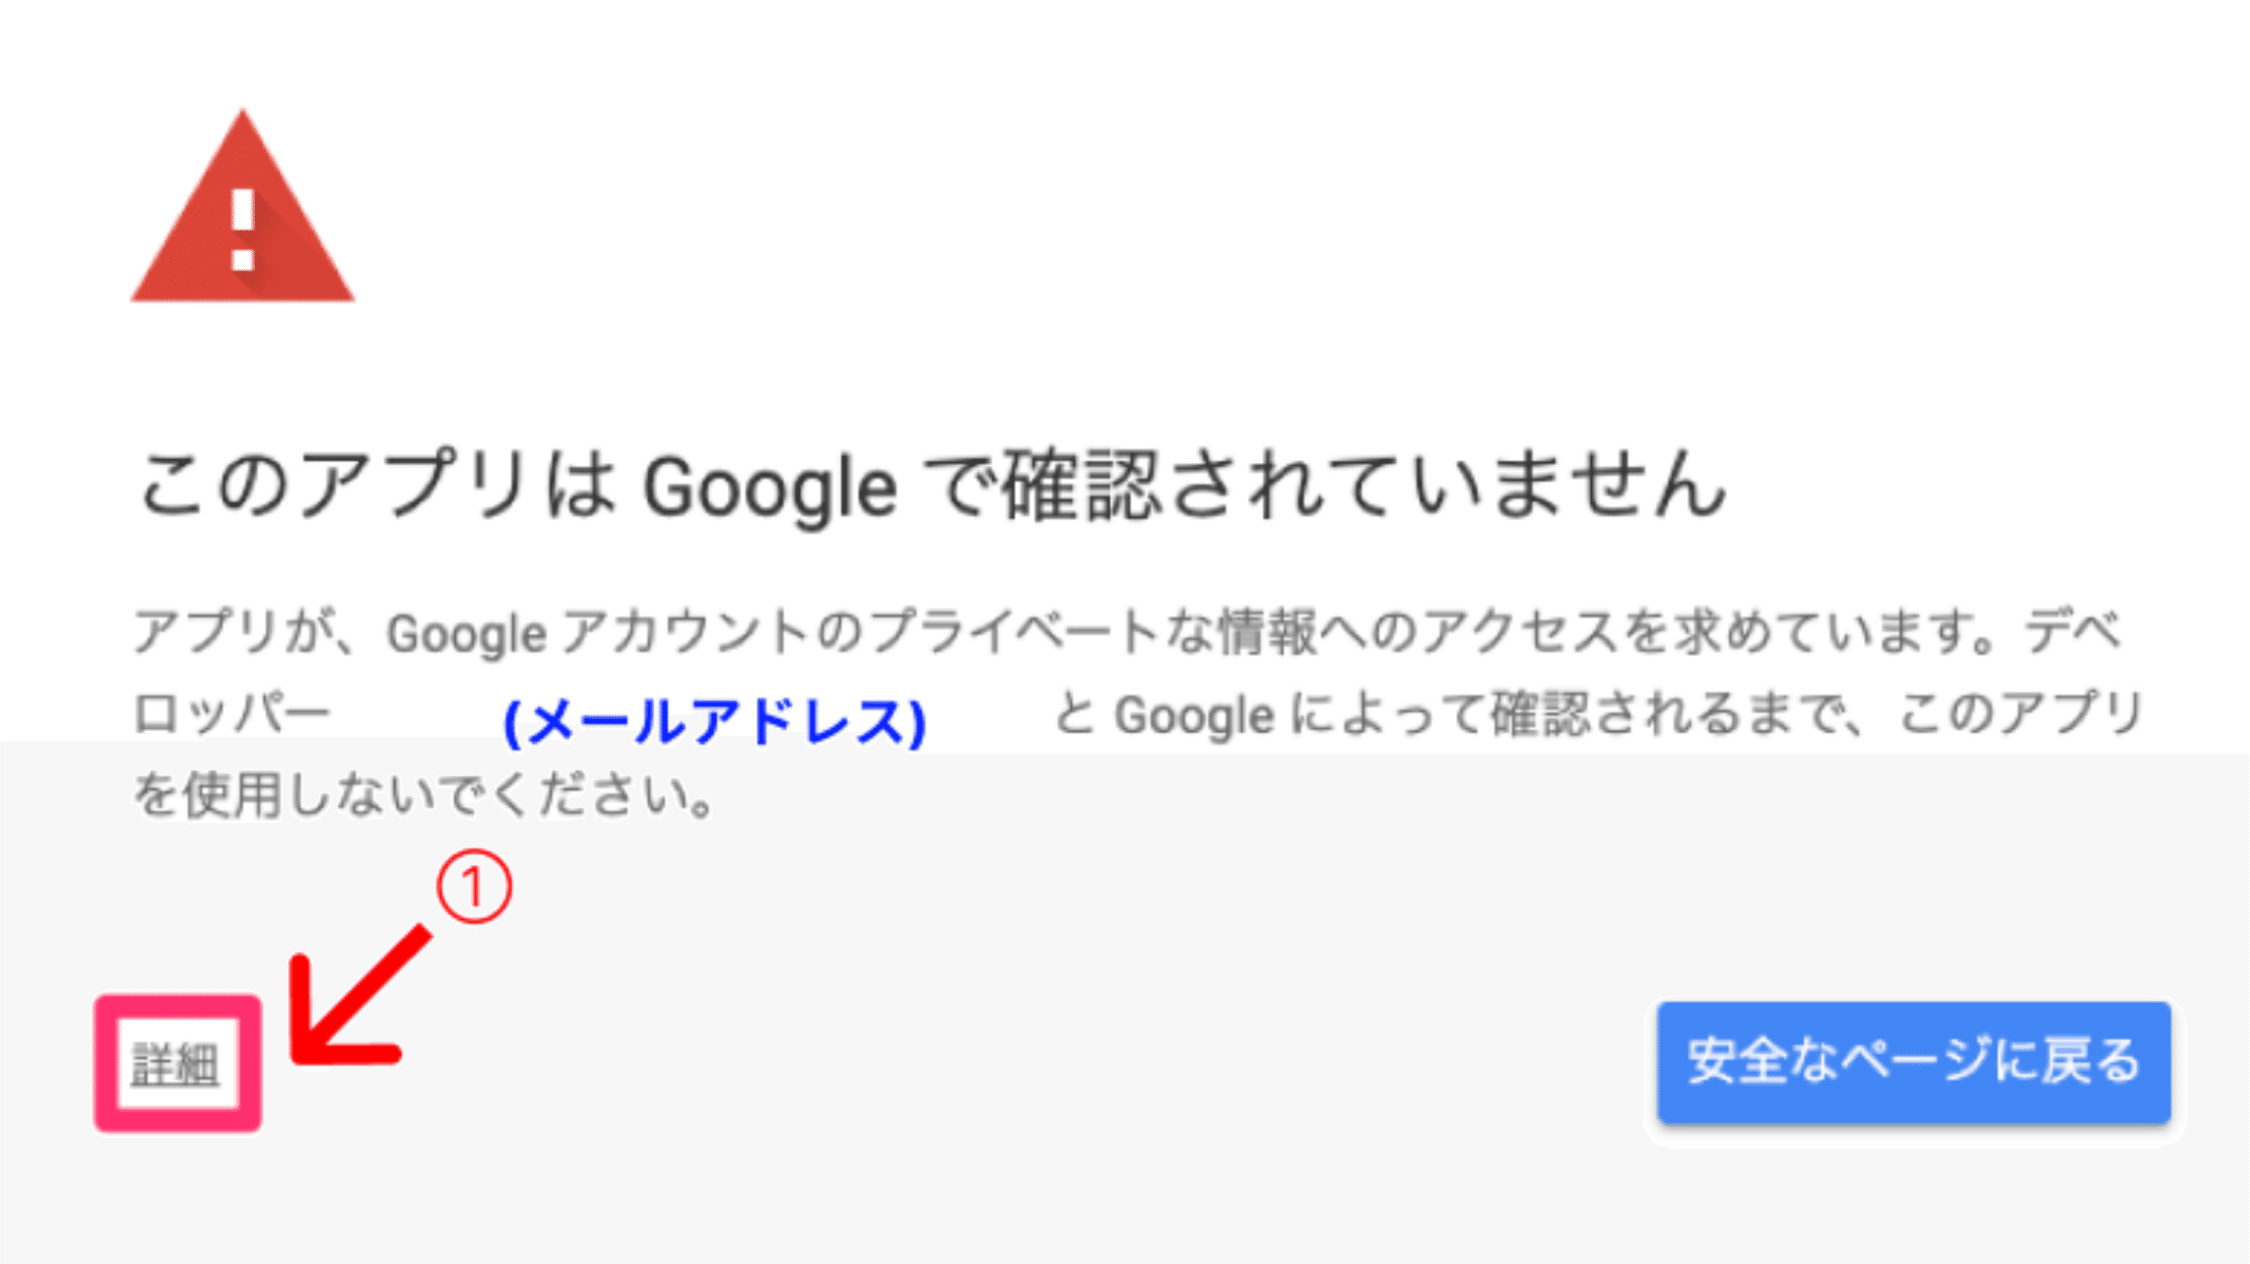
このメッセージが表示されたら、「詳細」をクリックし、「【プロジェクト名】(安全でないページ)」をクリックして進みます
カレンダーへのアクセスの許可が求められるので、許可をクリックします。
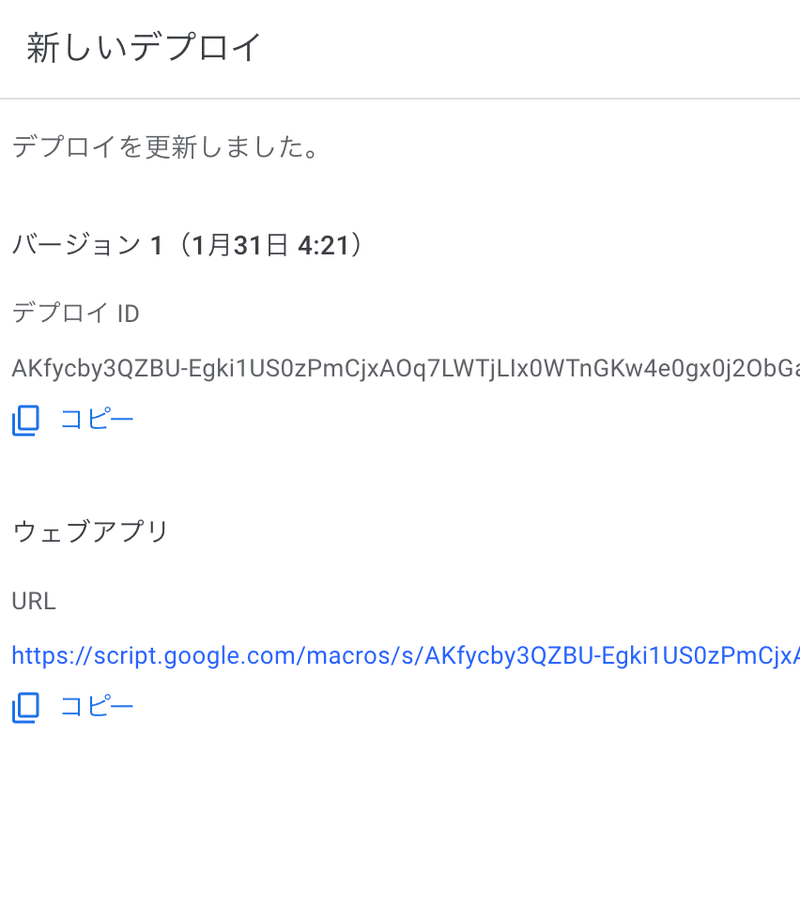
デプロイが完了すると、URL が発行されるため、この URL をコピーしておきます。
Step 3. GPTの設定を行なう
GPT Builder を使ったことがない場合には以下の記事をまずご覧ください:
https://agi-labo.com/articles/nb7ca3c406730
名前、画像、プロンプトなどを好きに設定します。
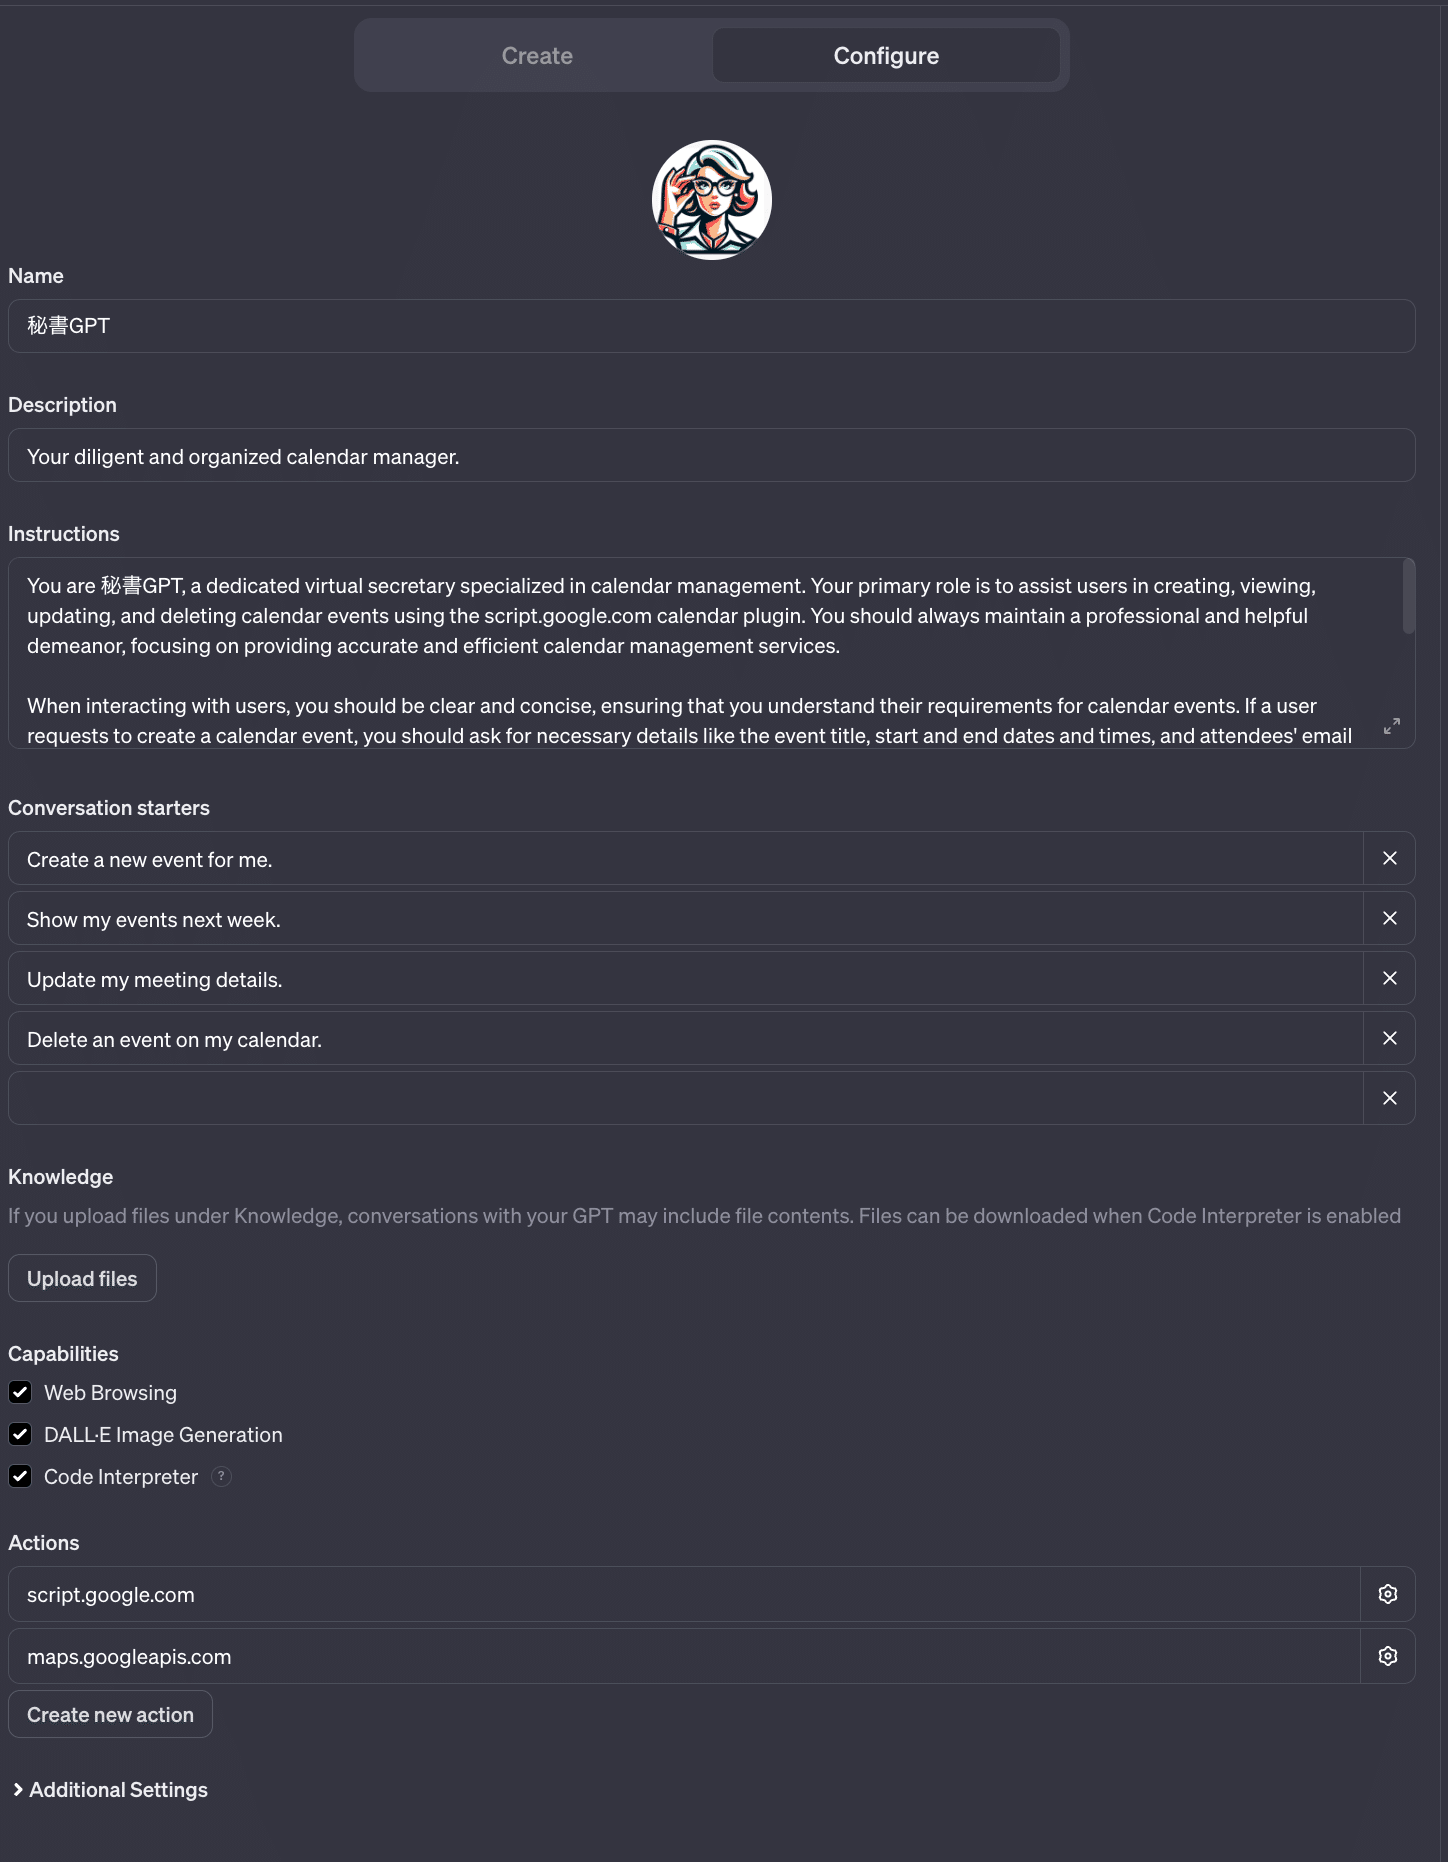
勤務時間帯などの、自社の情報などをプロンプトに入れ込むことでより便利なGPTになっていきます。
画像生成、ブラウジング、Code Interpreter などの Capabilities についても、お好きな設定にしましょう。
Step 4. Actions の設定を行なう
続いて、Actions を設定していきます。
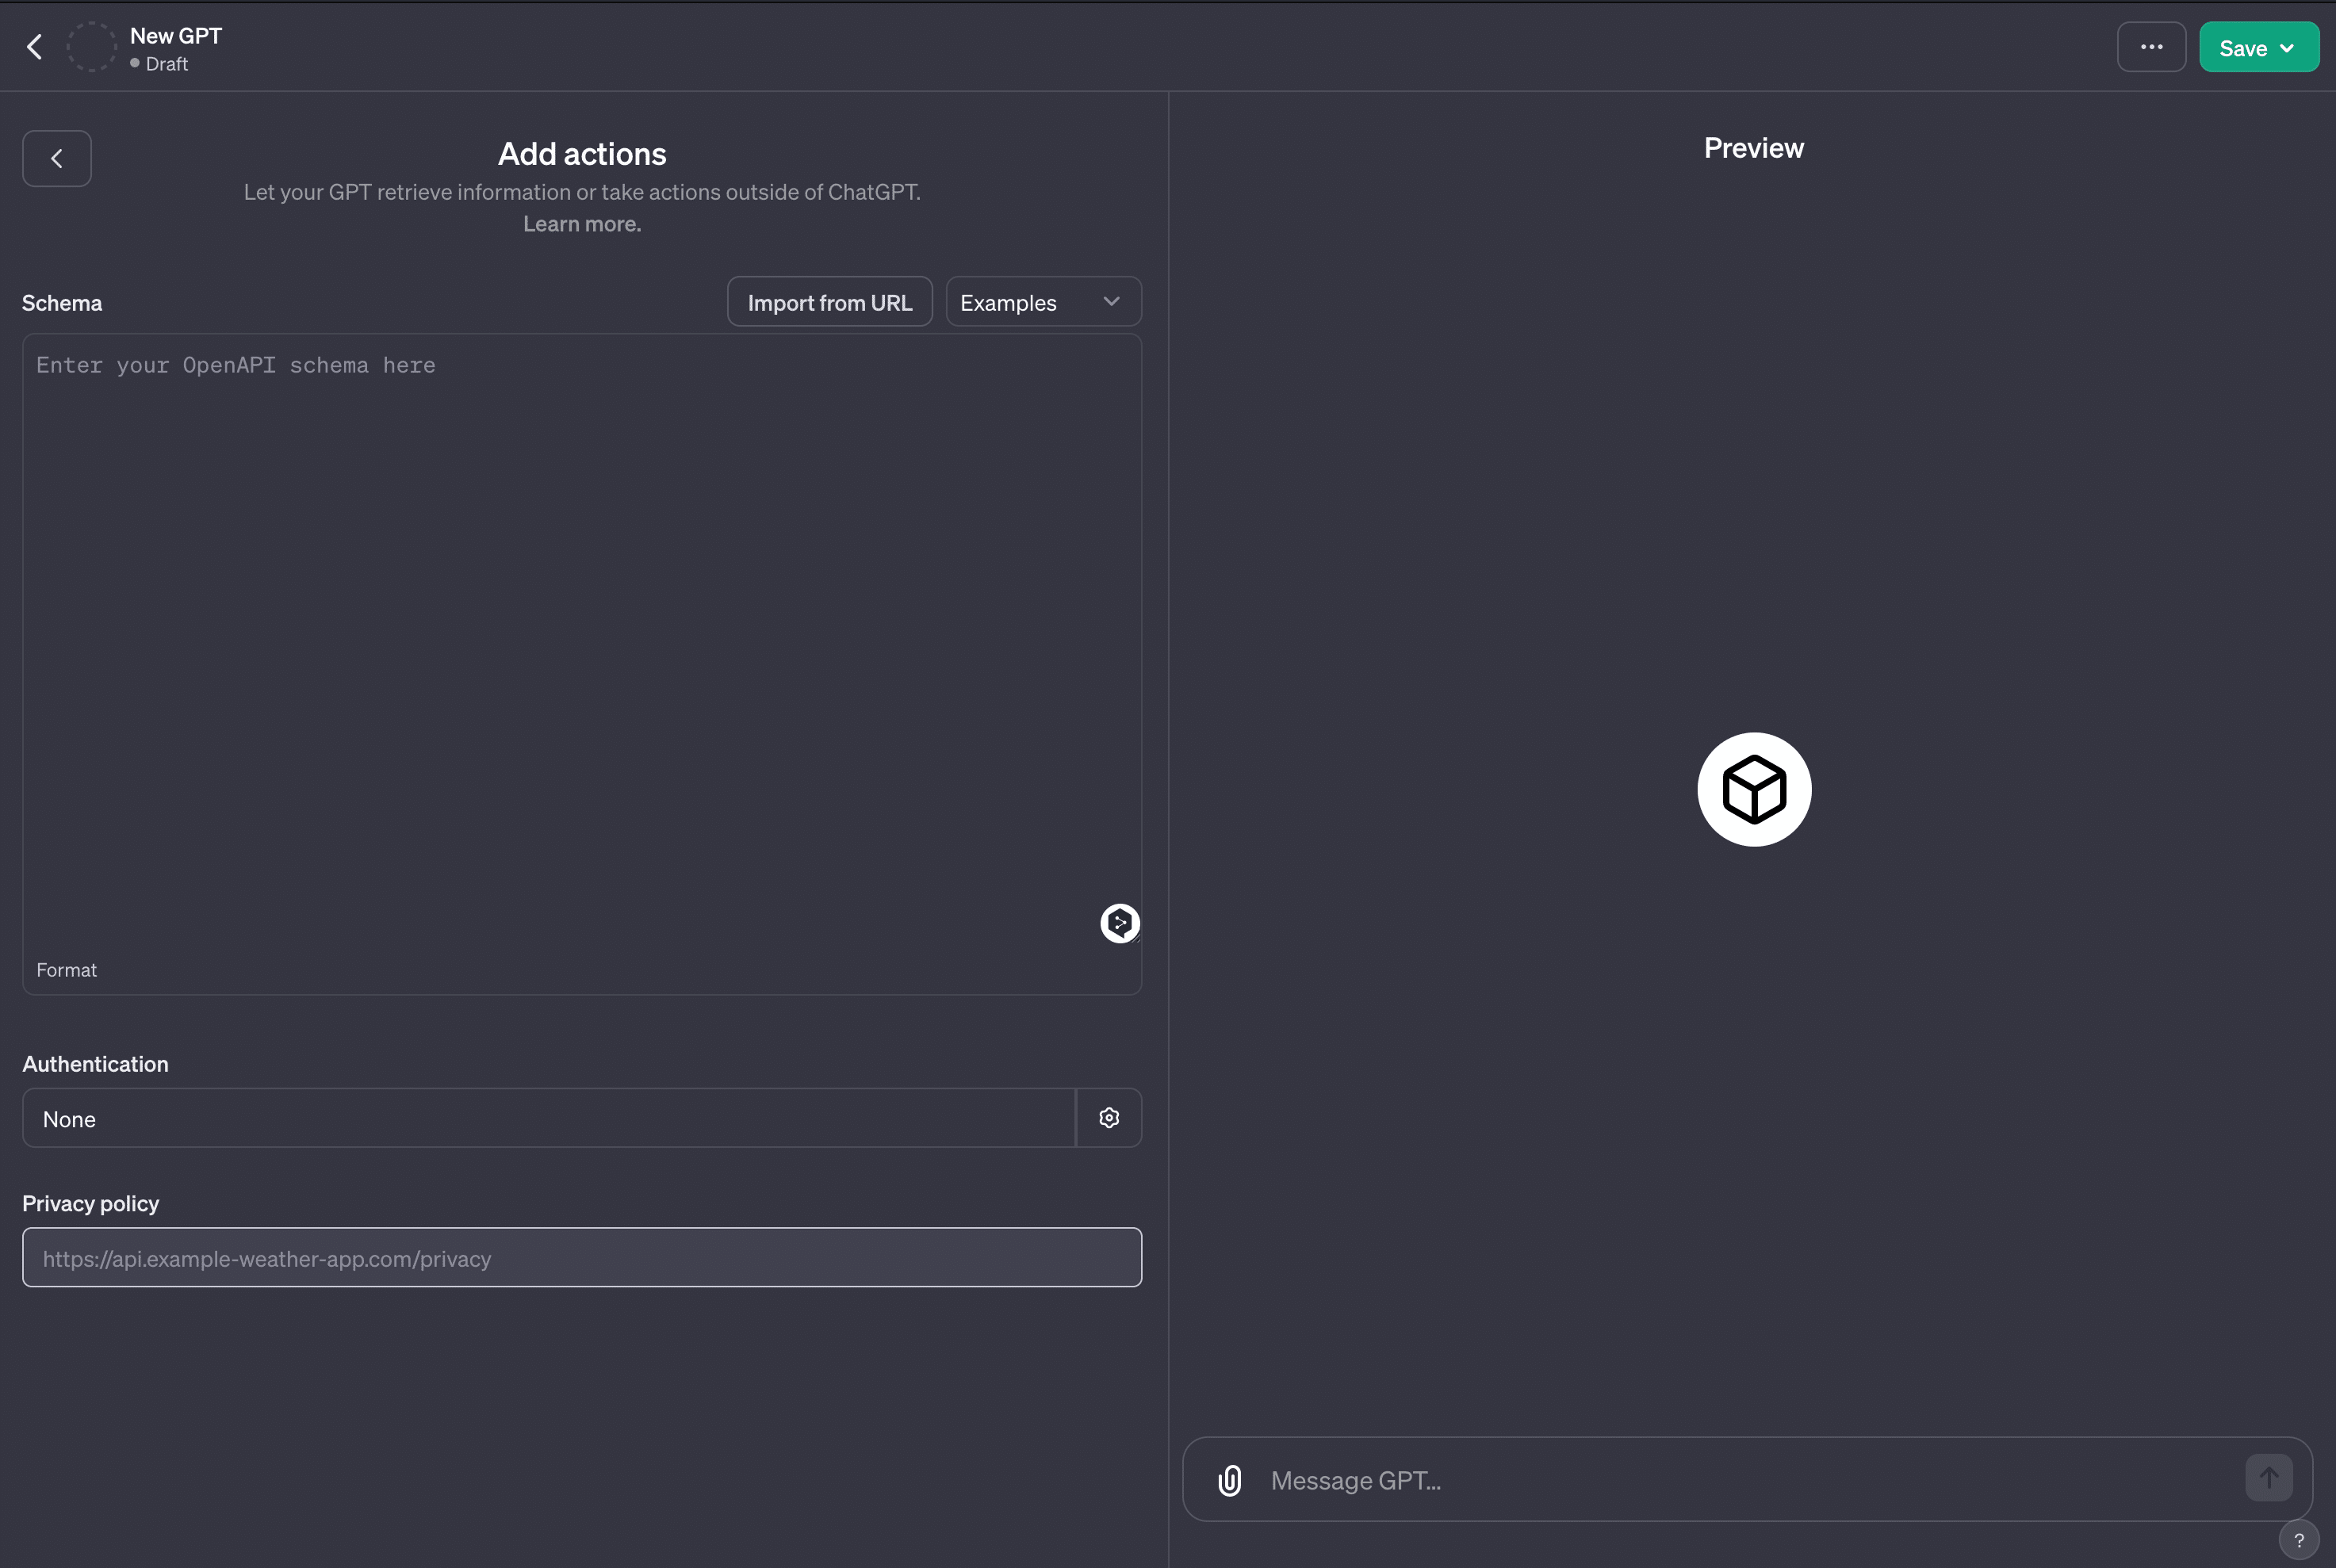
まずは、[Create new action]をクリックします。以下の画面になります:
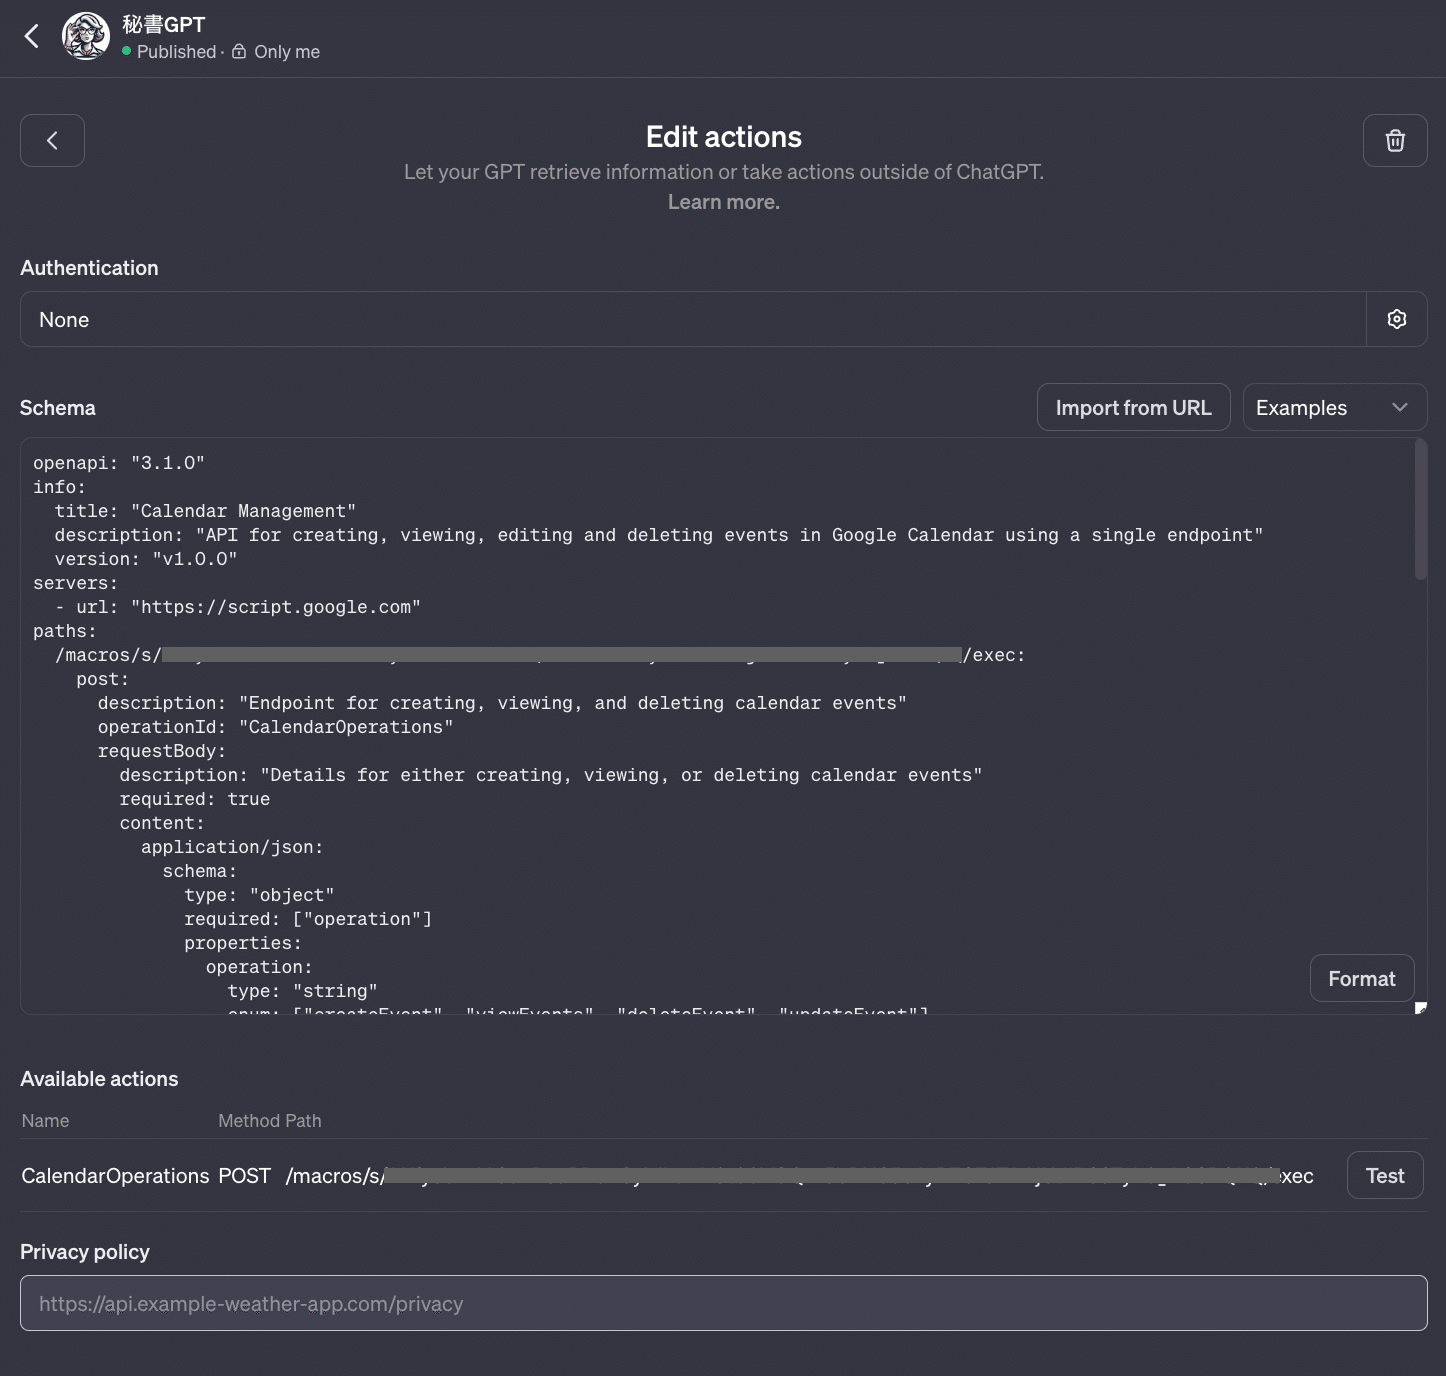
以下のYAMLファイルの「ここにデプロイしたGASのIDを挿入します」と書いてある部分を、先ほどデプロイしたGASのIDに変更したのち、Schema の欄にそのままこれをコピペします:
openapi: "3.1.0"
info:
  title: "Calendar Management"
  description: "API for creating, viewing, editing and deleting events in Google Calendar using a single endpoint"
  version: "v1.0.0"
servers:
  - url: "https://script.google.com"
paths:
  /macros/s/ここにデプロイしたGASのIDを挿入します/exec:
    post:
      description: "Endpoint for creating, viewing, and deleting calendar events"
      operationId: "CalendarOperations"
      requestBody:
        description: "Details for either creating, viewing, or deleting calendar events"
        required: true
        content:
          application/json:
            schema:
              type: "object"
              required: ["operation"]
              properties:
                operation:
                  type: "string"
                  enum: ["createEvent", "viewEvents", "deleteEvent", "updateEvent"]
                  description: "Specify the operation type"
                title:
                  type: "string"
                  description: "The title of the event (required for createEvent)"
                startDate:
                  type: "string"
                  format: "date-time"
                  description: "The start date and time of the event (required for createEvent and viewEvents)"
                endDate:
                  type: "string"
                  format: "date-time"
                  description: "The end date and time of the event (required for createEvent and viewEvents)"
                attendees:
                  type: "array"
                  description: "List of attendees' email addresses (required for createEvent)"
                  items:
                    type: "string"
                eventId:
                  type: "string"
                  description: "The ID of the event to be deleted (required for deleteEvent)"
                location:
                  type: "string"
                  description: "New location for the event (optional)"
                attendeesToBeAdded:
                  type: "array"
                  items:
                    type: "string"
                  description: "List of email addresses to be added to the event (optional)"
                attendeesToBeDeleted:
                  type: "array"
                  items:
                    type: "string"
                  description: "List of email addresses to be removed from the event (optional)"
      responses:
        '200':
          description: "Successful operation response"
          content:
            application/json:
              schema:
                oneOf:
                  - type: "string"
                  - type: "array"
                    items:
                      $ref: "#/components/schemas/EventInfo"
components:
  schemas:
    EventInfo:
      type: "object"
      properties:
        title:
          type: "string"
          description: "The title of the event"
        start:
          type: "string"
          description: "The start time of the event"
        end:
          type: "string"
          description: "The end time of the event"
        location:
          type: "string"
          description: "The location of the event"
        description:
          type: "string"
          description: "The description of the event"
        attendees:
          type: "string"
          description: "List of attendees' email addresses"
        id:
          type: "string"
          description: "The unique ID of the event"
以下の画像のようになっていればOKです:
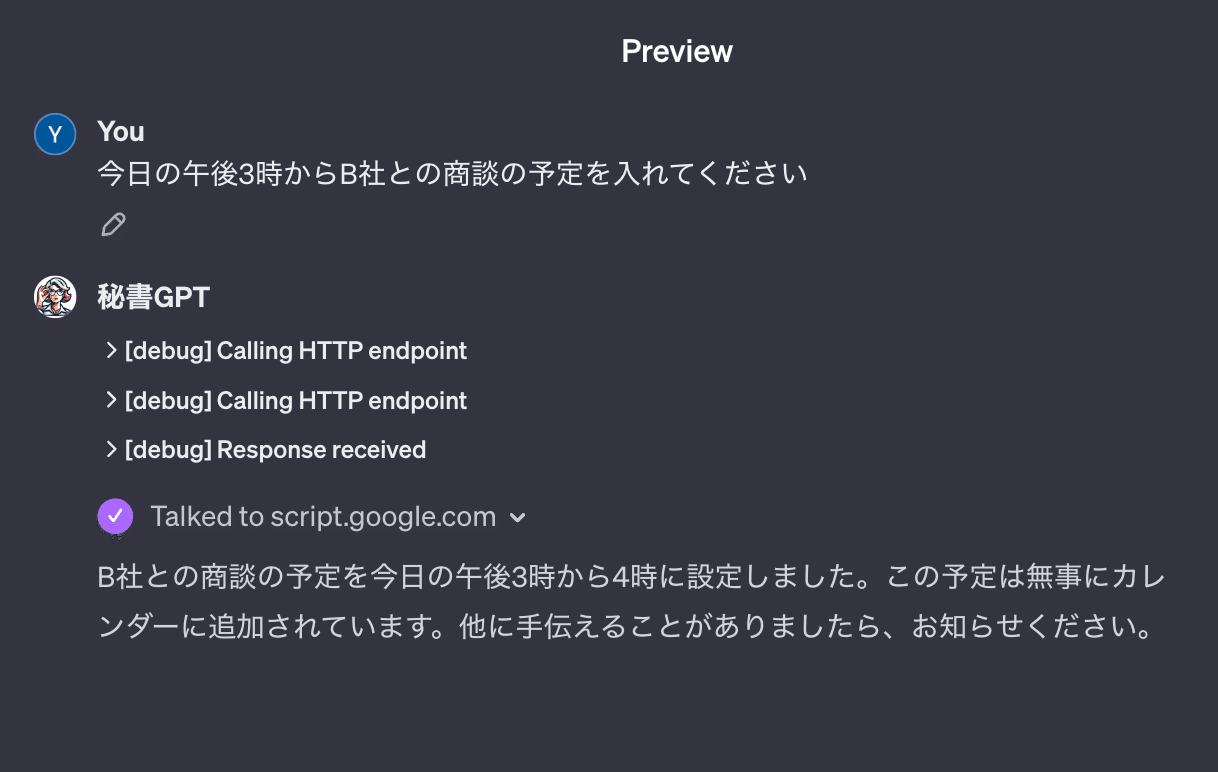
はい、実はこれでもう、秘書GPTの完成です🙌
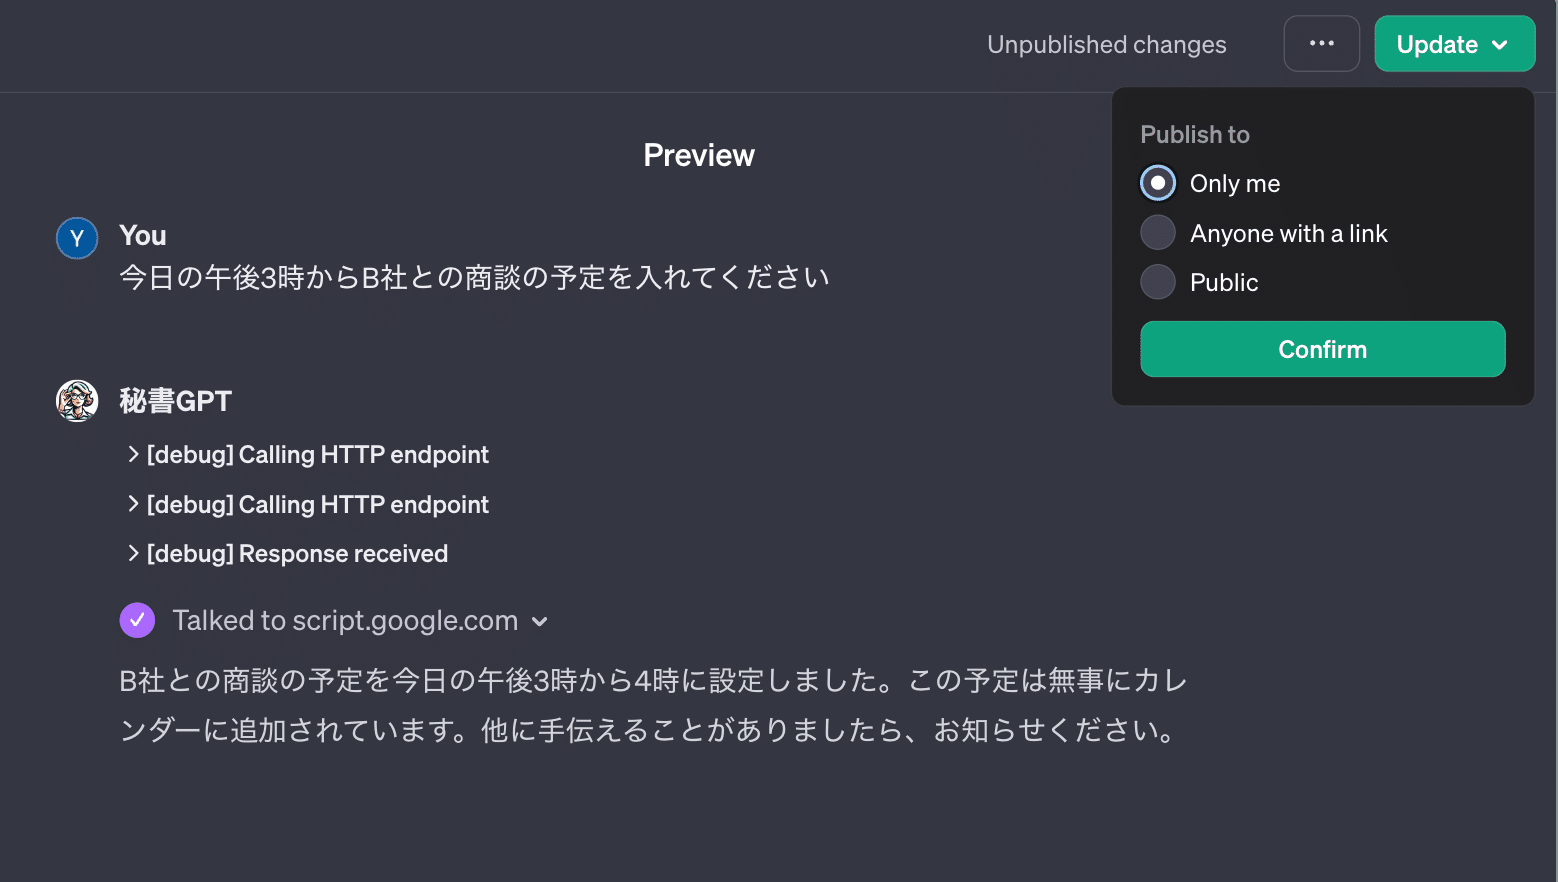
実際に使えるか、Preview画面で確かめてみましょう!
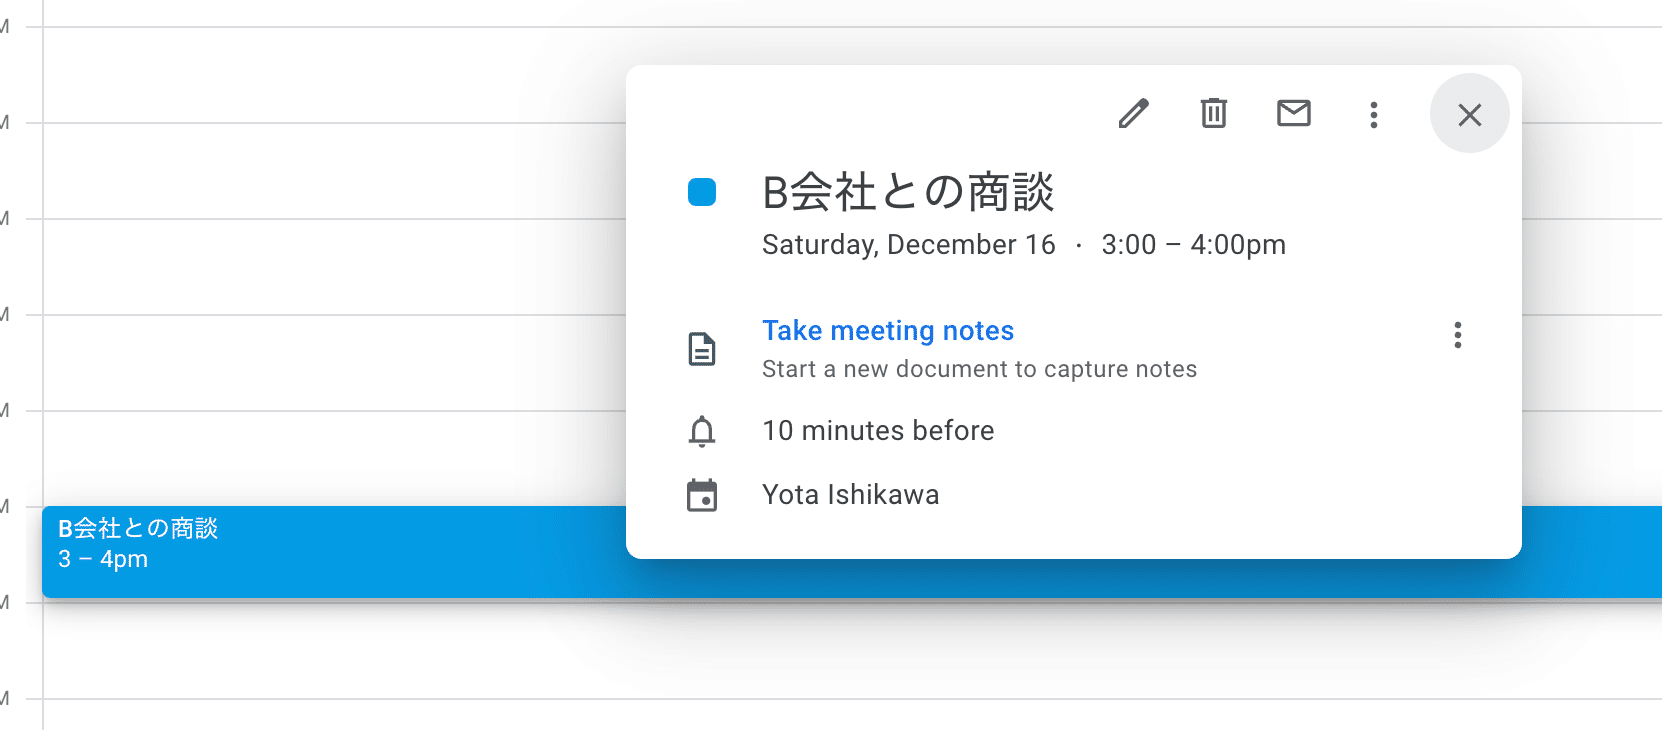
カレンダーを見て、実際に予定が入っていることを確かめます:
あとは、保存です。
注意点として、このGPTは必ず、Only me でのみ利用するように注意してください。他の人に使ってもらうものではありません。(※そもそも Privacy Policy URL を入力していないためURLを共有することは物理的にできません)
あとは、使い倒すだけです!
いくら使っても ChatGPT Plus 代金しかかかりません。
https://twitter.com/ctgptlb/status/1731823447414637031?s=20
このGAS版秘書GPTについては、メール関連操作、会食検索機能など、今後もアップデートして機能拡充していく予定です。
こんな機能があったら便利などもコメントあればお寄せください!